Sunday, March 30, 2014

Create a Google Plus Page and add the Badge to a Blogger Blog


Create a Google+ Page

Google is now offering Google+ Page for the users. You may also create a Google Plus Page for you or your product etc. Google Plus Page is also like a Facebook Fan Page. A Google Plus Page will help you to become popular or to spread your business. So create your Google+ Page to be connected with your friends, fans, customers, followers, visitors and so on. Lets follow the steps given below to create a Google Plus Page.

Log in to your Google Account first and visit your Google+ Account from here. Now look at the Right Side Bar and find out the writings Create a Google+ Page. Then click on the writings and create the page providing the necessary information. The steps of creating the page is too easy. Hope you have done all properly.


Adding Google Plus Page Badge


Google Plus Badge is so helpful for the blogger. You can now add a Google Plus Badge to your blogger blog so that the visitor can follow your blog. They can also help your blog to reach on the top of the Search Engines by adding G+ using your Goggle Page Badge. G+ is so helpful and effective for Search Impact you know. The more your visitors will click on the +1 button, then it will be more easier to reach in the top of search engine. Lets see how to add Google Plus Page Badge.

 Step 01  Log in to Google Account and Get the Codes
Log in to your Google Account first. Then go to your page and click on Get the badge>>. There are five different styles of Badges. Select one from them and check the review if you want. Finally select one and get the codes.

 Step 02  Lof in to Blogger Account and add HTML/JavaScript Gadget
Now copy the codes from the box and log in to your Blogger Account. Click on the Layout, then click on Add a Gadget. After clicking on Add a Gadget, a new pop-up window will open. There will have a list of gadgets. Find out HTML/JavaScript from them and click on it. Another new pop-up window will open.

 Step 03  Place the Gadget and Save the Settings
Now paste the codes into the Content Box and click on the Save button. Keep the title box empty. Now place the Gadget where you want to show.


Thursday, March 27, 2014

How to Add Facebook Like Button to Blogger Blog for Every Posts


Today Facebook Like Button is a very common Share Button for a Blog or Website. It is so hard to find out a Blog or Website without Facebook Like Button. You can measure the popularity of your Blog or Website through this Facebook Like Button. I think this Facebook Like Button is so essential and so helpful for a Blog or Website. Because the visitors can be inspired to read a post or article to see the popularity [Number of Facebook Likes] of a post or article. So follow the steps given below to add a Facebook Like Button for every posts of your Blogger Blog Site. You may also add this share button following the instructions of the Facebook Developer Page. But there is a problem. If you add Facebook Like Button following those instructions, then you wont get the correct counting of them who has liked your posts. So I have added JavaScript Codes, Attribution and Conditional Tags to solve this problem. So follow these steps to get the best Facebook Like Button in your Blogger Blog Site or in your Other Website.

facebook like button, best facebook like button, effective facebook like button

 Step 01  Log in to Your Blogger Blog Account First
As you need to work as admin of your blog so to Log-in to your Blogger Account. But if you want to add this Facebook Like Button to your another website then follow the fourth step.

 Step 02  Access the HTML Codes of Your Blog
Click on Template from the Left Side Menu. Then click on Edit HTML from the page to access the HTML Codes.

 Step 03  Find Out the Opening <body> Tag
Now click anywhere of the codes and press Ctrl+F button from your Keyboard. Then a Search Box will open at the uppermost right corner [if your Browser is Google Chrome] or at the lowermost left corner [if your Browser is Mozilla Firefox]. Now type <body and find out <body> or <body expr:class='&quot;loading&quot; + data:blog.mobileClass'> from the codes.

 Step 04  Add the Codes Given Below After <body> Tag
Now copy the codes given below in the box and paste the codes just after <body> or <body expr:class='&quot;loading&quot; + data:blog.mobileClass'> tag.

<div id="fb-root"></div>
<script>(function(d, s, id) {
  var js, fjs = d.getElementsByTagName(s)[0];
  if (d.getElementById(id)) return;
  js = d.createElement(s); js.id = id;
  js.src = "//connect.facebook.net/en_US/all.js#xfbml=1";
  fjs.parentNode.insertBefore(js, fjs);
}(document, 'script', 'facebook-jssdk'));</script>

You may also collect the above codes from the Facebook Site directly. Just click here to collect the codes for the Facebook Like Button. There you will also get the guideline to add Facebook Like Button in your Website or Blog. But remember if you want to show the Facebook Like Button in every post of your blog then follow my tutorial and use my customized codes. You will get the best result and the correct counting for every like buttons.

 Step 05  Add the Namespace Attribute
In this step you have to find out <html ...... xmlns:expr='http://www.google.com/2005/gml/expr'> from the codes. Just type gml/expr' into the Search Box to find out the codes. Now add the XML Namespace Attribute xmlns:fb='http://ogp.me/ns/fb#' just after the codes xmlns:expr='http://www.google.com/2005/gml/expr'. So the codes will look like <html ...... xmlns:expr='http://www.google.com/2005/gml/expr' xmlns:fb='http://ogp.me/ns/fb#'>. Look at the box given below to see the total change.

<html b:version='2' class='v2' expr:dir='data:blog.languageDirection' xmlns='http://www.w3.org/1999/xhtml' xmlns:b='http://www.google.com/2005/gml/b' xmlns:data='http://www.google.com/2005/gml/data' xmlns:expr='http://www.google.com/2005/gml/expr' xmlns:fb='http://ogp.me/ns/fb#'>
Don't forget to give a space before the Namespace Attribute.

 Step 06  Add the Codes for Facebook Like Button after <data:post.body/>
Again find out the codes <data:post.body/> and add the codes from the box given below after <data:post.body/>. If you add the codes after <data:post.body/> then the like button will be shown at the end of every posts of your blogger blog.
But if you want to show the Facebook Like Button just before the starting of the posts and after the Header Line then you have to find out <div class='post-header-line-1'/> and you have to paste the codes after this line.
Codes for My Customized Facebook Like Button

<div style='float:left;margin-top:-3px;width:75px;'>
<b:if cond='data:blog.pageType != &quot;static_page&quot;'>
<div class='fb-like' data-layout='button_count' data-send='false' data-show-faces='false' expr:href='data:post.canonicalUrl'/>
</b:if>
</div>

If you use the above codes then you will get the Facebook Like Button just like the button showing at the end of this tutorial. This button is perfect with all other buttons like Twitter Tweet Button, Digg Button, Linked In Share ButtonPinterest Pin It Button etc.
But if you want to use the default Facebook Like Button then use the following codes given bellow in the box.
Codes for the Default Facebook Like Button
.
<b:if cond='data:blog.pageType != &quot;static_page&quot;'> <div class="fb-like" expr:href="data:post.canonicalUrl" data-send="true" data-width="450" data-show-faces="true"></div>  </b:if>

 Step 07  Save Your Template
Now click on Save Templates to save your template and test the result. Hope you are happy now.

Why this Tutorial is Best for Facebook Like Button
than all Others
Because, I've Used Conditional Tag
If you follow the other tutorial or the instruction from Facebook Developer Page then you will get the following codes for the Facebook Like Button. But if you use this codes then you wont get the correct counting for the Facebook Like Button.
<div class="fb-like" data-send="true" data-width="450" data-show-faces="true"></div>

Now look at the codes I have customized for you all. In these codes I have used Conditional Tag  <b:if cond='data:blog.pageType != &quot;static_page&quot;'> and I have added attribution  expr:href="data:post.canonicalUrl" after the codes div class="fb-like" for the best result.
<b:if cond='data:blog.pageType != &quot;static_page&quot;'>
<div class="fb-like" expr:href="data:post.canonicalUrl" data-send="true" data-width="450" data-show-faces="true"></div>  </b:if>

Because, I've Used XML Namespace Attribute
I have also used XML Namespace Attribute xmlns:fb='http://ogp.me/ns/fb#' after the codes xmlns:expr='http://www.google.com/2005/gml/expr' what is really so important for the Blogger Blog Users.

Because, I've Customized the Position
And finally look at the codes of my Customized Facebook Like Button. There you will found <div style='float:left;margin-top:-3px;width:75px;'> at the first of all. In these codes I have used float:left; to set the Facebook Like Button at the left side. You may use float:right; to set the Facebook Like Button at the Right Side.
I have also used margin-top:-3px; to up the Facebook Like Button slightly. Because when I was trying to use all other Share Buttons with it then the Facebook Like Button was not in the same line. So to set this share button in same line with other share buttons you may also use and change this codes. I have used margin-top:-3px; in my blog www.dakbox.blogspot.com but I have used margin-top:-0.5px; in this blog.

Because, I've Customized the Width
I have used width:75px; to declare the width of the Facebook Like Button. Otherwise there will be a large gap between two share buttons. Facebook Like Button need only 75px to show its button and counting data. But you may use the number as you want in your blog or website.

You may also Customize the Following
Look there is written data-show-faces="true". That means if someone visit any of your Blog Posts then he/she will see him/her Facebook Friends faces. But remember he/she won't see any faces if none of his/her Facebook Friend don't like this post. If you change the codes like data-show-faces="false" then the Faces won't be available.
Facebook Like Button for Blogger, How to add facebook like button, adding facebook like button, What is adsense, adsense, online earning, earn with adsense, google adsense


Wednesday, March 26, 2014

How much you will earn by Google Adsense?

Today Google AdSense is a very popular program to earn money from online!!! Thousands of Bloggers and Website Owners are earning using this program. There are a very few websites without Google AdSense Ads. You may also earn like others following some easy but sensitive steps. Read my writings on Google Adsense also to know the basic important things about it. First of all, being approved for AdSense Program is not so easy but possible. And never think that you will start to earn a lot just after placing the Ads on your webpages. There are some Basic Rules and Regulations You Should Follow to be successful. Your website and the content should go through the rules and regulations. There are also a risk to be suspended or banned for your activities after being approved if you don't follow the rules and regulations of Google AdSense.

Things You Shouldn't Do...

After placing ads on the webpages, the publishers eagerly wait to see however only a cent in his/her Adsense Account. Most often they check their account to see the earnings. But... It may take few days also to get the first click. So, don't be crazy about earning and never ask anyone to click on the Ads showing on your website. You just try to provide more and more helpful unique contents. Only then the visitors will increase day by day and the chance of earning will also increase. Let's know what you shouldn't do...
  1. Don't be crazy for the earnings, just keep posting.
  2. Don't provide any content doesn't meet the Google AdSense Rules and Regulations.
  3. Don't ask anyone to click on the Ads showing on your webpages.
  4. Don't click on the Ads you also.
  5. Don't change the AdSense Codes. You have right to change the Ad's Color and Type only.
AdSense,Online Earning,Earn Money
How much you can earn using AdSense Program
How Much You Can Earn from a Single Click?

I am a publisher from Bangladesh, but I received the first click from India. Actually Google shows the ads on publishers webpages according to the region, content and interest of the users. It means if you are from Korea then in major cases you will see the Ads of Korean Products etc. in this page. The Advertisers pay a fixed amount to Google for a bundle of clicks. Advertisers also pay for CPM(Cost Per Mile), Page revenue per thousand impression(RPM) etc. So you will be paid according to the Ads CPC etc. Generally an Indian Advertiser never pay a lot for an Ad. So the price for every click will be low. For example, I earn 0.20$ most often if anyone click on a Ad from India. On the other hand I earn up to 1.32$ if someone click from USA. This is the difference. Sometimes I get only 0.01$ against a click. Only 1.5% of the total visitors click on Ads according to my experience. Things you should know about Google AdSense Earnings.
  1. The visitor will found the Ads depending on their region, search history and most importantly depending your content's keywords.
  2. You will earn sufficient if a visitor click on an Ad according to his/her own interest.
  3. Expensive Keywords will show the high paying ads and you can earn more from a single click.
  4. I have earned 0.01$ to 1.56$ for a single click from this website.
  5. Provide helpful unique content to increase the visitors, the more visitors will help you to earn more.
  6. Place the Ads in right places with perfect color combination to attract the visitors.
Life Style with Google AdSense

There are a lots of publishers who are earning a huge amount of money from Google Adsense. I have heard about an Indian who earns about 30,000$ per months. Some publishers earn more than this Indian. You may also earn like this if you can make the visitors bound to visit your website. You need to provide the Helpful Unique Contents, try for SEO (Search Engine Optimization) and socialize your website to earn like this. You may apply some tips and tricks for more traffics in your website. The following lifestyle you will lead as a Google AdSense Publisher...
  1. You will lead a life as a Freelancer.
  2. Your home or anywhere you go will be your office.
  3. You just need a Laptop with internet connection to work.
  4. You may take a leave whenever you want.
  5. You needn't to work under pressure.
  6. You have a great chance to show your creativity here in this field.
  7. You can share your knowledge, thoughts and ideas with all others.
  8. You will be able to earn staying at home.
  9. You have no boundary or limit of earning.
  10. Your writings will become your asset.
  11. You may increase your earnings as much as you need.
  12. There is no any boss to force you.


Tuesday, March 25, 2014

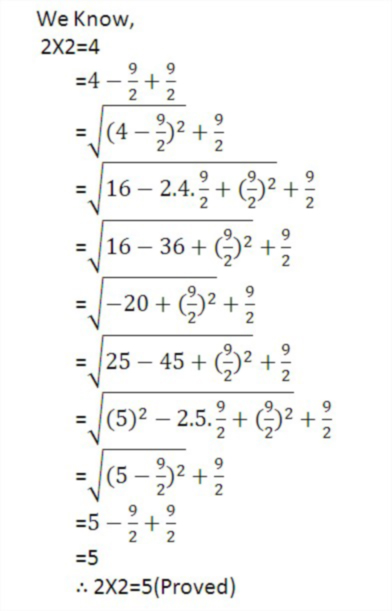
Lets Solve an Exclusive Math: 2X2=5 is also Correct


2X1=1
2X2=5
2X3=6
2X4=8
Hey, have I done any mistake? You will must tell that I have already done a Great Mistake. You may also think that I am so weak in Math! Because, I have written 2X2=5 instead of 2X2=4. Isn't it? But today, I will prove that 2X2=5. Lets see the math providing in the image given below. Then you will be able to understand that 2X2=4 is not always true and 2X2=5 is never wrong! Hope you will like this post! If you like, then please share this post with your friends!
online earning, google adsense, computer tips and tricks, facebook, twitter, notepad fun, website designing, blogging tips

Something Strange in Notepad, Have a Fun :)


Though Notepad is a built in very simple text editor but we can perform a lots of exclusive and funny things using it. In this post I will show something strange and I will do that using Notepad. We know that, September 11, 2001 is a so remarkable date. Because the terrorist group attacked Twin Tower at that day! The terrorist group hijacked four jet plane and crashed two of them through twin tower. But do you know the Jet Plane number was Q33N? May you know or not! Now see something strange about it...!!!

 Step 01  Open Notepad First
Just open a Notepad. To open Notepad, press Windows Key+R from the keyboard. After doing so, the RUN Command box will appear at the lowermost left corner. Now input notepad as the RUN Command and press the Enter Key or click on the OK button. The Notepad program will run.

 Step 02  Type Q33N and Change the Font Face and Size
Now type Q33N on the notepad and click on Format from the menu bar of the notepad. A drop-down menu will open. Now click on Font... from the drop-down menu. Then a new pop-up window will open. Now select Wingdings as the font and select 72 as the font size. Then you will found a jet plane, two towers and a danger sign on the Notepad!

So what do you think now? How can it possible? Isn't it strange? You will found something like the image given below after following the above steps. But remember, you have to write Q33N not q33n. You will get the same result both in Wordpad or MS Office Word also.


How to Edit a Dark Image in Photoshop


Light a Dark Image using Adobe Photoshop

Dark Photo Editing in Photoshop

We all know that Adobe Photoshop is a very essential and most popular software to edit images. Not only to edit images but also Photoshop plays many important roles in some other sectors. We may also make web-album using still photos in Photoshop.  It won't be finished if I start to say the uses of Adobe Photoshop Application Software. However today I will show here to edit a Dark Image. Lets follow the steps to edit a Dark Image.

 Step 01  Open the Image in Adobe Photoshop
Run Adobe Photoshop Software and double click on the blank space of the window. The explorer will open automatically. Now browse the folder and select that photo you want to edit and click on Open. You may also double click on that Image to open.

There is another way to open an Image. Locate the image first, then right click on it. A pop-up menu will open. Then click on Edit with Photoshop. The image will automatically open with Photoshop.

 Step 02  Change the Value
Now click on Image from the menu of Photoshop. A drop-down menu will open. Now click on Adjustments and then Curves... A new window will open named Curves. You have to now increase the light of the image. However you may open this Curve Window by pressing Ctrl+M from your Keyboard. That means Ctrl+M is the shortcut keys to open this window.

Look at the Curves Window given below and find out where is the mouse pointer. Then you have to also keep your mouse pointer as shown and you have to click. Look now there is showing Input: 0 and Output: 0. And most importantly the value are fixed. But when you will click on this place where the mouse pointer is showing in the Image. Then the value will be editable. Keep 0 for Input and 50 for Output. Then click OK button.
 Step 03  Adjust the Brightness and the Contrast
Click on Image again as like as before. Then click on Adjustment and then click on Brightness/Contrast. Now you have to adjust as you need. You need to increase the Brightness and the Contrast both to get the best result.

 Step 04  Adjust the Color Balance Depending on the Image
Now press Ctrl+B from your Keyboard to open the Color balance Window and adjust the Color depending on the image as you like.


Sunday, March 23, 2014

How to Make Your Windows 7 Genuine Using Command Prompt


In all the Developing Countries most of the Computer Users generally use the Trial Version or Pirated Copy of Windows Operating System. Because they don't have the ability to buy a Genuine Copy of the Windows OS. So, after a few weeks or after the expiration date windows start to show message to activate windows. That means now the time to buy a Genuine Copy of Windows OS. There should have Valid Product Key with every copy of Genuine Windows. So, you anyone can activate your windows after buying a copy. Most often the people who use the trial version or pirated copy don't do this. They re-install the trial version or pirated copy of windows again removing the existing installation. It takes about half an hour to install windows. And they loss all other installed application programs due to re-installing the OS. In a word they loss all the data contained in the C Drive.

If you are also in the same situation, then what you will do? Will you re-install the pirated copy? You may not have DVD/CD Drive installed with your Computer System. Then...?

In these cases, you may do something different. You may take more 30 days from windows. Just follow the steps given below to use Windows 7 without any tension for the next 30 days. If you do this then you will get another chance to use your installed windows for more 30 days. Even you will be able to update your windows without any hesitation. You will feel that you are using a Genuine Copy of Windows. Lets see how to do it.

 Step 01  Open the RUN Command Box
Press Windows Key+R together to open the RUN Command Box. Then type CMD as the RUN Command and press Enter Key or click on OK Button.


 Step 02  Open the RUN Prompt
After clicking on the OK Button you will get the command prompt window. Note that you have to open the RUN Command Prompt as an Administrator. Now type SLMGR -REARM and press Enter Key. Wait a while. You will get a Message.


 Step 03  Click on OK to Finish the Process
After pressing the Enter Key you will get an pop-up window. Now click on OK. Restart your computer and use the windows happily.


Tuesday, March 18, 2014

Learn different type text formatting

We have to display different types of texts in different styles. That's why there are different tags to format the text differently.

For example: if you want to display underlined text, then you have to put the text inside the <u> and </u> tags. If you want to display deleted text, then you have to use the tags <del> and </del>.

Besides, you have to use CSS to style texts differently. You can fix the size, color, font-weight etc. using CSS.

For example: the <h1> and </h1> tags make the texts larger than all and also make the text bold. But inside the <head> and </head> tag if you keep the CSS h1{size: 12px; color: #333;}, then the heading text's size and color will be changed. In the next tutorials, you will learn CSS.

Emphasis Text

Emphasis Texts look like Italic Text. We have to use <em> and </em> tags to get Emphasis Text. Jut keep the text between <em> and </em> for the Emphasis Text. Example of Emphasis Text is given below...

This is emphasis Text


Strong Text

Strong Texts look like Bold Text. We have to use the tags <strong> and </strong> to define the texts as Strong. Example of Strong Texts are given below...

This is Strong Text


Small Text

Small Texts are a little bit of smaller texts than the normal size of text. Look at the example given below. However we need to use the tags <small> and </small> to write small texts.

This is Small Text


Inserted Text

Inserted Texts look like Underlined Text. We have to keep the texts between <ins> and </ins> tags to get the Inserted Texts. The example of Inserted Texts are given below.

This is Inserted Text

Deleted Text

The example of Deleted Texts is given below. The Deleted Texts looks like the Strikethrough Texts. We need to use <del> and </del> tags to form Deleted Texts.

This is Deleted Text

Marked/Highlighted Text

Use the Tags <mark> and </mark> to get Marked/Highlighted Texts. The example of Highlighted Text is given below.

This is Marked/Highlighted Text


Computer Code Text

We need to use <code> and </code> tags to get Compute Code Text. Computer Code Text is a special type of text. See the example given below.

This is Computer Code Text


Sample Computer Code Text

We have to type our text between <samp> and </samp> tags to get the Sample Computer Text. This type of text is similar to Computer Code Text. See the example given below.

This is Sample Computer Text


Keyboard Text

To get Keyboard Text you have to keep the text between <kbd> and </kbd> tags. Keyboard Text looks like Computer Code Text. See the example given below.

Example:
This is Keyboard Text


Variable Text

You have to keep your text between <var> and </var> tags to get Variable Texts. The example of Variable Texts is given below.

This is Variable Text


Preformatted Text

To get Preformatted Text you have to keep your text between <pre> and </pre> tags. The example of Preformatted Texts is given below.

This is Preformatted Text


Abbreviation Text

This text defines an Abbreviation or an Acronym. So this is important to decorate a Webpage. Look at the example given below and keep the mouse pointer on RAM. When you will keep your mouse pointer on RAM then Random Access Memory will be appear. We have to use <abbr> and </abbr> tags and the attribute title="Your Text". Look at the codes and result to understand properly.

Codes I have Used
<abbr title="Random Access Memory">RAM</abbr> is very important for a Computer System

Result for the Above Codes
RAM is very important for a Computer System

Direction Text

Direction Text is a type of text where we may set the text Left to Right or Right to Left. See the example given below to understand Direction Text properly. We have to use <bdo> and </bdo> tags to define Text Direction. But we must have to use dir="value" attribute with the start tag <bdo>. Then the codes will be  for Left to Right Text and we have to use <bdo dir="rtl">TEXT DIRECTION</bdo> for Right to Left Text. See the example given below to understand properly.

Codes for Left to Right Text
<bdo dir="ltr">TEXT DIRECTION</bdo>

Result:
TEXT DIRECTION

Codes for Right to Left Text
<bdo dir="rtl">TEXT DIRECTION</bdo>

Result:
TEXT DIRECTION


Quoted Text

We may get Quoted Text using <q> and </q> tags. If we keep any text between <q> and </q> then we will get two Quotation Sign at the beginning and at the end of that text. See the example given below.

Codes for Quoted Text:
<q>This is Quoted Text</q>

Result:
This is Quoted Text


« Previous Tutorial
Next Tutorial »


Sunday, March 16, 2014

What to Do Before Starting Wordpess for the First Time


 Step 01  Download XAMPP and Install it
Your Computer System have to have installed XAMPP to run a wordpress site or even to start Wordpress for the first time. XAMPP will help your Computer System to act like a Local Host. That's why you need to download XAMPP from here if you don't have. Now install XAMPP, the steps of installing are too easy.

 Step 02  RUN the XAMPP Control Panel
After installing XAMPP, run it. Then you will get a Control Panel as like as the image given below. Now click on the Start Buttons and wait a while. Now minimize the Control Panel. Now your Computer System is ready to host a website locally.
 Step 03  Keep the Wordpress Files into the folder htdocs
Now download the latest version of Wordpress from here. Then you have to unzip the file. Finally copy the extracted files to the directory C:/xampp/htdocs. This directory will be available after installing XAMPP.

 Step 04  Follow the Posts Given Below
Now you have to create a database to run a Wordpress Site. And later you have to provide the Database Connection detail. So, follow the post given below.

1. Creating Database to Start Your First Webpage in Wordpress
2. Enter the Database Connection Detail Before Start Wordpress
NEXT

Advertisement

Sunday, March 2, 2014

Enter the Database Connection Detail Before Start Wordpress


 Step 01  Fill the Form and Click on Submit Button
Now type the URL http://localhost/wordpress/wp-admin/setup-config.php?step=1 and press the Enter Key. A form will appear as given below. Now provide the Database Name as you like. But must provide root as the User Name and don't provide anything as password. Then click on Submit. 
 Step 02  Fill the Form and Click on Install Wordpress
After clicking on the Submit button, a form will appear like below. Now fill the form as showed in the image and click on Install Wordpress.
 Step 03  Now Click on Log In Button
After clicking on Submit, you will get the Success Confirmation message as shown below. Now click on the Log In button.

 Step 04  Log In to Your Wordpress Account
After clicking on Log In, you will get the Logging In page to log in. Now provide the User Name and Password you used previous used and click on Log In button again.
Hope, you are already in the Draft of your site. Now you can add new posts, to customize the site from here.

Creating Database to Start Your First Webpage in Wordpress

 Step 01  Click on New to Create a New Database
Type the URL http://localhost/phpmyadmin into the address bar of the browser and the press the Enter Key. Now click on New as showed in the image given below.
 Step 02  Provide the Database Name and Click on Create
After clicking on New you will get a window to create a Database. Now provide a database name as I have provided Uzzwal and click on Create. 
 Step 03  Get the Confirmation Message
After clicking on Create, the Database will be created. Finally you will get the Confirmation Message as like as the image given below.
PREVNEXT