Monday, April 28, 2014

Reduce/decrease the size of an image tremendously

Sometimes we need to decrease/reduce the size of an image. We generally do it when we need to upload it online. Mainly the online news editors do it before publishing a news. They have to publish lots of images all day long. If they don't decrease the size of images then it will take too long time to load their news site.

The webmasters also do the same when they add a logo or any other images on a website. Because the main goal of all is to decrease the loading time of a website. Photoshop allows you to decrease the size of an image tremendously. Let's try it now to see how much you can decrease of an image.
photoshop tutorial,reduce image size,decrease image size

 Step 01  Open an image in Photoshop
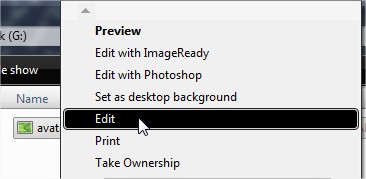
At first you need to open the selected image in Photoshop. Right click on the image you want to edit, then a pop up menu will open. Now click on Open with Photoshop. After opening the image in Photoshop, then press Alt+Shift+Ctrl+S or click on Save for web... under file menu. A pop-up window will open like the image given below.

NB. You may crop the image to leave the portion you actually don't need. It will also reduce the size of an image outstandingly.

 Step 02  Select original tab to know the real size of the image
Now select the tab named Original (the portion I have identified by 1) as I have shown in the above image. Then look at the lowermost left corner of the window (the portion I have identified by 3) to see the original size of the image.

 Step 03  Change some settings to decrease the size of the image
Now you need to change some settings to decrease the size of the image. You have to change the following given below to decrease the size of the image.
  1. Image Type:
    First of all change the image type from the Preset section (the section I have identified by 4). You will found there is selected .PNG format by default, change it to .JPEG and select the tab Optimized. You will notice that the size of the image has decreased a lot.

  2. Image Quality:
    Now change the image quality to low.The option to change the image quality is also at the Preset section.

  3. Image Size:
    Change the image size to decrease the data size of the image. To do so, click on the tab Image Size as shown in the image below. Then provide the width or height in the New Size section and click on apply to review the size again till you get your expected size.

    NB. When you will change the width, then the height will be changes automatically depending on the new width.

 Step 04  Click on Save to save the image
Finally click on the Save button to save the image. Then locate the saved image and right click on the image, then click on Properties to see the decreased size of the image.

Advertisement

Wednesday, April 23, 2014

Stop Autorun to Protect a Computer System from Viruses


When we insert a CD/DVD Disk in a Disk Drive, then a pop-up menu open automatically. We also get such a menu when we connect a Pen Drive or any other Flash Disk. It happens for autorun file. But if there have any harmful autorun then your Computer System may be attacked by viruses or warms.You may stop Autorun to protect the Autorun Viruses. Lets follow the steps given below...

 Step 01  Open the RUN Command Box
Press Windows Key+R buttons together to open the RUN Command Box. Now type gpedit.msc into the Text Input Box and press the Enter Key or click on the OK Button.

 Step 02  Find Out Turn Off Autoplay
Now a window will open named Group Policy. You have to click on Administrator Template from the menu of the left side of the window. Then click on System and look at the list of the right side of the window. Now find out the option Turn off Autoplay from the list and double click on it. You may have to scroll down the list to get this option.

 Step 03  Stop Autonrun for All Drives
After clicking on Turn off Autoplay, a pop-up window will open named Turn off Autoplay Properties. Now you have to check the Radio Button named Enabled. Look, there is a drop-down list  also. Click on the Down Arrow Sign and select All Drives from the list to stop autorun for all drives. Then click on Apply and finally click on the OK button.

 Step 04  Do the Same for User Configuration
I've done it for Computer Configuration, but you also need to do the same for User Configuration. So go to the left side menu again of the Group Policy Window. Again click on Administrative Templates and then click on System. The process is almost same like the previous configuration. Hope you will be able to do the rest.


Sunday, April 20, 2014

Lets Know Your Computer Male or Female


Lets Know Your Computer's Gender
Do you know your Computer also has it's own gender? Your Computer may be Male or Female! But you don't know about the gender of your computer. Now I will show you the way to know the Gender of your Computer. Lets follow the given below to be informed about the gender of your Computer.
male,female,sex,computers sex

 Step 01  Open a Notepad Document
First of all you need to open notepad document as we need to write some codes on that. To open a Notepad Document, simply press the Windows Key+R buttons together. Then the RUN Command Box will open. Now type notepad as the RUN Command and press the Enter Key or press on the OK button. Then a Notepad Document will open.

 Step 02  Add Some Codes and Save the Document
Now type the codes CreateObject("SAPI.SpVoice").Speak"How are you boss?" into the Notepad Document and save the document as Computer_Gender.vbs or anything you like. You just remember to add the file extension .vbs with the file name.

 Step 03  RUN the .VBS file and Listen the Voice
Now locate .vbs file you have saved just before a while and double click on that to run. After double clicking on that, you will listen the line "How are you boss?" and in a very short time. If you hear a male voice then your computer is male and if you hear the female voice then your computer is female.


Thursday, April 17, 2014

Changing Marquee Direction and Behaviour


Generally the Marquee goes left from right. But we may change the Direction of a marquee by using some attribute and different values. The every sets of codes is able to create a single web page if we use them. So simply copy the codes and press Windows Key+R together to open a notepad document. Then press Ctrl+V to paste the copied codes on the notepad. Now save the document with .htm or .html file extension. Finally locate the .html file and open it in a browser, you will get the result.
marquee, up/down marquee,marquee tag, website designing
Codes for the Marquee of Left Direction
 01 <html>
 02 <head>
 03 <title>Left  Marquee</title>
 04 </head>
 05 <body>
 06 <font color="3778CD" size="12">
 07 <marquee direction="left">
 08 www.iDhali.com
 09 </marquee>
 10 </font>
 11 </body>
 12 </html>
   
www.iDhali.com 
Codes for the Marquee of Right Direction
 01 <html>
 02 <head>
 03 </head>
 04 <body>
 05 <font color="3778CD" size="12">
 06 <marquee direction="right">
 07 www.iDhali.com
 08 </marquee>
 09 </font>
 10 </body>
 11 </html>
www.iDhali.com Codes for the Marquee of Up Direction
 01 <html>
 02 <head>
 03 <title>Up Marquee</title>
 04 </head>
 05 <body>
 06 <font color="3778CD" size="12">
 07 <marquee direction="up">
 08 www.iDhali.com
 09 </marquee>
 10 </font>
 11 </body>
 12 </html>
www.iDhali.com Codes for the Marquee of Down Direction
 01 <html>
 02 <head>
 03 <title>Down Marquee</title>
 04 </head>
 05 <body>
 06 <font color="3778CD" size="12">
 07 <marquee direction="down">
 08 www.iDhali.com
 09 </marquee>
 10 </font>
 11 </body>
 12 </html>
www.iDhali.com Stop Marquee on Mouseover
 01 <html>
 02 <head>
 03 <title>Mouseover Behaviour</title>
 04 </head>
 05 <body>
 06 <font color="3778CD" size="12">
 07 <marquee onMouseOver="this.stop()" onMouseOut="this.start()">
 08 www.iDhali.com
 09 </font>
 10 </marquee>
 11 </body>
 12 </html>

www.iDhali.com


Short codes for Facebook emoticons and more

During chatting in Facebook most often we use emoticons to represent our emotion. Not only in chatting, we also use emoticons during commenting on someone's status.

We use emoticons to represent our sadness, happiness, smiley and many more. And we use different short codes to represent different emotions. For example: we use :) to show smiley face when we feel happy, we use :( to represent our sadness etc.

Such 33 short codes are given below for 33 different emotions. You can use all of them in Facebook and in all other social media. Even you may use them in this blog during commenting. Look there is a comment box below the post and there are several ways to comment including Facebook.
facebook emoticons,emotion,smiley
So you may try these short codes in this website also. However try them yourself and have more fun. Just share this post among your friends if you feel it is helpful for them.

~♥♥♥ FACEBOOK EMOTICON ♥♥♥~

Laughing Face 
:)
Man Wearing Glasses
8)
Wow Face
:o
Laughing Face With Teeth
:D
Man Wearing Glasses
8-)
Wow Face
:-o
Sad Face
:(
Face With Small Eyes
-_-
Face
:/
Twinkling Face
;)
Heart/Love Sign
<3
Face
:\
Face Showing Tongue
:p
Crying Face
:'(
Twinkling Face With Lipstick
:*
Funny Face
>:o
Sad Face With Small Eyes
>:(
Face
:3
Laughing Face Wearing Sun-glass
8|
Sad Face With Small Eyes
>:-(
Box Face With Red Eyes
:|]
Laughing Face Wearing Sun-glass
8-|
Broken Face
:v
Smart Boy
:putnam:
Red 42
:42:
Penguin
<(")
Something Strange
(^^^)
Twinkling Face With Lipstick
:-*
Laughing Face With Horn
3:)
Face Wearing Hat
O:)
Laughing Face with Small Eyes
^_^
Face With Two Different Eyes
O.o
Like Sign
(Y)


Wednesday, April 16, 2014

How to Adjust Size of Facebook Cover Photo


Besides profile photo most of the Facebook users use a cover photo in their profile. But most often the users fail to adjust the cover photo. Because, facebook has defined a dimension by default. That's why when we upload a large image then some portion of that image remains hidden/missing.

If you want to show your expected portion of an image, then you need to know the default size of facebook cover photo and you also need to know to resize an image. You can resize an image using adobe photoshop and also using microsoft paint.

In this post you will learn to adjust a facebook cover photo using ms paint. Let's see, how to do that.


 Step 01  Open an image in ms paint
Select an image you want to use as Facebook cover photo. Now right click on that image, a pop-up menu will open as like as the image given below. Simply click on Edit as showing in the image below.
 Step 02  Now click on resize
After clicking on Edit the image will open in MS Paint. Now click on Resize as showing in the image below or simply press Ctrl+W keys together.
 Step 03  Put the values to resize that image
After clicking on Resize a pop up window will open like the image given below. Now you have to select the Radio Button Pixels and deselect the box where is written Maintain aspect ratio. Then put the value 851 as Horizontal and 315 as Vertical. And finally click on the OK button.
 Step 04  Your Expected Size
After clicking on the OK button, the image will be resized to 851x315px. The example image with the valid aspect ratio for Facebook Cover Photo is given below.
 Step 05  Save the resized image now
To save the resized image, click on the Save button as showing in the image below or simply press Ctrl+S buttons together to save the image. Finally, locate the image and look the image is resized to your expected dimension.
Now you can upload this photo in Facebook as your Cover Photo. This photo will properly adjust as a cover photo.

N.B. You have already noticed that ms paint can't resize an image perfectly. Ms paint just set the height and width of an image, but it can't crop an image. That's why the objects of the image doesn't look okay. So, you can use photoshop to crop a portion of an image according to your expected ratio.

Recommended posts...
» Resize an image using Adobe Photoshop
» The standard size of images
» Decrease the size of an image
Advertisement

Be Available or Unavailable to Selected Facebook Friends


You may be now available or unavailable for some selected people or a list. You may have lots of friends in your list, but you are not interested to chat with all of them. In this case you may hide yourself from all except some selected people or a group of people. Lets see how to do it.
hide me from facebook friends, hide me from selected facebook people, be available for some of my friends
~Creating List~

 Step 01  Log-in to Your Facebook Account First
At first you need to log in to your Facebook Account and then click on Home from the blue colored menu bar located above all. Now scroll down and find out FRIENDS from the left sidebar. Now mouse hover on FRIENDS, there a writings MORE will appear. Click on that.

 Step 02  Create a Lists Now
After clicking, a new page will open with all of the lists of your friends. Now click on the button Create List, a pop-up window will open. Now provide the list name and add members into the list. Finally click on Create button. After clicking on the Create button, the activities of the listed friends will show.

~Configuring to be Available/Unavailable~

 Step 01  Click on Chat List Now & Find Out Options Button
Now click on the Chat List if it is not opened. Find out the Options button and click on that. After clicking on Options, a pop-up list will open. Now click on Advanced Settings, a pop-up window will open.

 Step 02  Be Available for a Group of People or a List
There are three options available in the pop-up window, 1. Turn on chat for all friends except..., 2. Turn on chat for only some friends... and 3. Turn off chat. But you need to click on Turn on chat for only some friends... to keep yourself active for only some friends or a list. After clicking on, you have to provide the List Name for whom you want to be available on Facebook. Finally click on the Save button.


How to Use Notepad as a Personal Diary


Though Notepad is a simple text editor application, but it has a wide use. We may also use Notepad as a Personal Diary. It's not so tough to make a diary using Notepad. When you will open the diary to write your notes then the date and time will be added automatically and it will happen for every access of your diary. Lets make a personal diary following the steps given below and keep your notes.
 Step 01  Open a Notepad Document
First of all you have to open a Notepad Document. Normally press Windows Key+R together, the RUN Command Box will open. Now type notepad into the box and press the Enter Key or click on the OK Button. Then a new notepad document will open.

 Step 02  Type .LOG at the Beginning
Now need to type .LOG at the beginning of all as shown in the image below.
 Step 03  Save the Document as .LOG Extension
Now we need to save the document as a log file. That means we need to save the document with .log extension. To do so need to click on File from the menu, a drop-down menu will open. Now need to click on Save As... to save the document. After clicking on Save As..., a pop-up window will open. Now need to add the extension .LOG with the file name. Finally click on Save to save the file.

 Step 04  Open the Log File and Use Your Diary
Now locate the saved log file and open it for the first time. Look, there are the current date and time already inserted and every time when you will open this log file, the current date and time will be inserted. Now write something as you want and save the document normally. Open it after a few moments again. Look, now there is also the current date and time inserted again. Thus you can save your words or feelings time to time.


Don't Waste the Electricity and Natural Gas! Once we will be the Sufferer!!!


Tuesday, April 15, 2014

How to use an Android Phone as a WiFi Hotspot


Why?
# Because you may use internet in several WiFi enabled devices at a time
# It is secured not public. No one will be access your Internet Connection within the password
# There will be a default password, but you may change it as you want
# You can also change the hotspot name if you want
# You may have several WiFi enable mobile phones, laptops etc. You may use internet in all of them at a time using your WiFi Hotspot
# It takes a very few seconds to be connected
# You just turn on your WiFi Hotspot and then turn on WiFi in which devices you want to use the internet connection
wifi hotspot,android phone,android wifi hotspot
How to enable WiFi Hotspot?
You have to have Internet Connection enabled in your Android Phone. Then go to Settings>Wireless & Networks>Tethering & Portable Hotspot>Portable WLAN Hotspot and enable it. Now your Android Phone is a WiFi Hotspot and able to serve internet connection among all other WiFi enabled devices.

How to access the password or change it?
Again go to Settings>Wireless & Networks>Tethering & Portable Hotspot>Portable WLAN Hotspot Settings and tap on this. Then tap on the writings Configure WLAN Hotspot. After tapping a pop-up window will open. Now tap on the text Show Password, you will get the password. Change this if you want, but the password must be of minimum eight characters. Now tap on the button Save.

You may also change the name of the WiFi Hotspot if you want. After changing the name or password simply touch the home button of the phone.


Wednesday, April 9, 2014

Hiding drives of a hard disk without any software

Yes, you can hide a drive of your HDD without any software. The way of hiding a drive is easy and simple. In this post I will show you the way to hide a drive using RUN Command. We need to use the RUN Command gpedit.msc to access the Group Policy Editor and then we will change some settings to hide a specific drive. We may also hide several drives of a HDD if we want.

If we hide the D Drive, then only the C, E, F drives will appear in the list. Thus we may keep our data safe from unauthorized people. Lets follow the steps given below to hide the expected drives.
hiding drive,hide a drive,hide hdd drive
 Step 01  Open RUN command box
Simply press Windows Key+R Buttons together to open the RUN Command Box or go to Start>All Programs>Accessories>RUN. After opening the RUN Command Box, type gpedit.msc into the text input box as shown in the image below. Now press the Enter Key or click on the OK Button.
Hide HDD, Hide Hard Disk Drive
 Step 02  Find out windows explorer
After clicking on the OK button, a pop-up window will open named Local Group Policy Editor as like as the image below. Now click on Administrative Templates under User Configuration section as shown in the image. Then click on Windows Components and find out Windows Explorer. Now click on Windows Explorer and after clicking on Windows Explorer, you will get a line written Hide this specified drivers in my Computer. Double click on it.
HDD, Hard Disk Drive, Hide Hard Disk Drive
 Step 03  Check the radio button Enabled
After double clicking on the writings Hide this specified drivers in my Computer, another pop-up window will open like the image given below. There you will found three radio buttons like Not Configured, Enabled and Disabled. Now you have to click on the second one Enabled.
Hard Disk Drive, HDD, Hard Disc
 Step 04  Select the drive you want to hide
When you will click on Enabled  then you will get a drop-down list into the box named Options. Now you have to select your expected drive/drives that you want to hide. You will get the following list given below.

-Restrict A and B drives only
-Restrict C drive only
-Restrict D drive only
-Restrict A, B and C drives only
-Restrict A, B, C and D drives only
-Restrict All Drives
-Do not Restrict Drives

Select your expected settings from the list and click on the Apply button from the window. Finally click on the OK button.

After completing all the above steps, press Windows Key+E buttons together. Windows explorer will open, you will see that the drive/drives you were hidden is no more.


Monday, April 7, 2014

Add LinkedIn Share Button for Every Posts of Your Blogger Blog


Sharing blog posts with more and more people via different types of social networks is important to increase the visitors. LinkedIn is a very popular Social Network Site today. There are more than 90 million active users in LinkedIn from more than 200 countries. So, if you add a LinkedIn Share Button in your blog or website, then the visitors will be able to share your Blog Posts among their LinkedIn Community. Thus you will get more visitors/traffics from LinkedIn Community. Lets see how to add a LinkedIn Share Button in a Blogger Blog.

 Step 01  Log-in to Your Blogger Account First
First of all you have to Log-in to your Blogger Account. Now click on Template from the left side menu. Then click on Edit HTML to access the HTML Codes of your Blog's Template. After clicking on Edit HTML, you will be able to access all of the codes of your Blog's Template.

 Step 02  Find Out the Codes <data:post.body>
In this step you have to click anywhere of the codes showing on the HTML Editor and then press Ctrl+F buttons together to open the Search Box. Look the Search Box has opened at the topmost right corner [if your browser is Google Chrome] or at the lowermost left corner [if your browser is Mozilla Firefox]. Now type the codes <data:post.body> into the Search Box and press the Enter Key from your Keyboard to find out them.

 Step 03  Paste the Following Codes after <data:post.body>
Now copy the Codes given below into the Box and paste them just after the codes <data:post.body>.
<b:if cond='data:blog.pageType == &quot;item&quot;'> <div style='float:left;margin-left:1px;'>
<script src='http://platform.linkedin.com/in.js' type='text/javascript'/><script data-counter='right' expr:data-url='data:post.url' type='in/share'/>
</div>
</b:if>

 Step 04  Save the Template and Reload the Website
You have to now click on the button Save Template to save the Template of the Blog. Then visit the Blog to see the newly added LinkedIn Share Button.


Sunday, April 6, 2014

How to Remove Unnecessary Windows Component


Most of the Windows Users use another Browser Software instead of the built in Internet Explorer. Because, Internet Explorer is slower than all other Browser Software. There are some more Applications included in Windows Operating System, but we don't use. For example- MSN Explorer, Windows Messenger, Outlook Express etc. So, these Applications are burden for a Computer System. The Computer System will be more reliable and more fast if we Remove these Unnecessary Windows Components! The Hard Disk Drive will be more free after Removing Them.
 Step 01  Open Control Panel
First of all cick on the Start Menu, then click on Control Panel. Now click on Add/Remove Program.

 Step 02  Click on Add/Remove Windows Component
After clicking on Add or Remove Programs a new pop-up window will open. Then click on Add/Remove Windows Components as showing in the image given below.
 Step 03  Deselect the Components You Want to Remove
After clicking on Add/Remove Windows Component you have to wait for a while. A new pop-up window will open like the image given below. Now deselect those components you want to stop and click on Next. You have to again wait for a moment after clicking on Next Button.
 Step 05  Finally click on the Finish Button
Click on Finish Button now and Restart the Computer System.

Best wishes for you all! Hope you will be able to do so very well. Some memory will be save if you do so. And most importantly your Computer will be more fast than before. Remove some other installed Application Programs you don't use or you use rarely.


How to Delete Unnecessary RUN Command


Sometimes we type wrong Commands into the RUN Command Box. You have to access the Registry Editor of the Computer to delete/remove those wrong Commands. To delete the Wrong Commands follow the steps given below.

 Step 01  Type Regedit in RUN Command
Open the RUN Command Box and type Regedit into the RUN Command Box. Then press the Enter Key. You have to press Windows Key+R together to open the RUN Command Box.

 Step 02  Find RunMRU
After pressing the Enter Key, the Registry Editor Window will open. Now you have to follow this path HKEY_USERS>.DEFAULT>Software>Microsoft>Windows>CurrentVersion>Explorer>RunMRU. You may fail to find out RunMRU through this path. Then press Ctrl+F to open the Find Box and type RunMRU into the box, then press the Enter Key. Now you will get RunMRU. But remember, you must have to type RunMRU, not runmru or RUNMRU.

 Step 03  Now Delete the Command You Want
Look, all of the Commands you have typed before- is present here at the Right Side of the Registry Editor Box. Keep your mouse pointer on a Command you want to delete and press right button of your mouse. A pop-up menu will open. Now click on Delete to delete the Command.


Hide the Control Panel of the Computer System to Avoid Unauthorized Chnages

Control Panel is one of the Important Options of a Computer System. Control Panel is used to control both Hardware and Software of a Computer System. Anyone can change the Settings of a Computer System using Control Panel when he/she is logged in. You may have to share your Computer with your Brothers, Sisters or Cousins. They may change the settings of your Computer System as they like. But the changes may be boring or harmful for you.

In this situation, you may hide the Control Panel from your computer's Start Menu. Then no one will be able to change the settings of your Computer System. To hide the Control Panel you have to follow the steps given below.

 Step 01  Open the Run Command Box first
Press Windows Key+R Buttons at a time to open RUN Command Box. After opening the RUN Command Box, now you have to type gpedit.msc into the Command Box and then press Enter or click on OK Button.
 Step 02  Found Control Panel and Double Click on It
After clicking on the OK Button or after pressing the Enter Button, a pop-up window will open like the image given below. Now click on  Administrative Template showing in the image under User Configuration. Now look at the right side of the window, there you will found Control Panel. Now double-click on Control Panel.
 Step 03  Double Click om Prohibit Access to the Control Panel
After double-clicking on Control Panel you will get some new options like the image given below. Now find out Prohibit Access to the Control Panel and double-click on it.
 Step 04  Click on Enabled>Apply>OK
After double clicking on Prohibit Access to the Control Panel you will get the following new pop-up window like the image given below. Now you have to click on Enabled and the click on Apply. And finally click on OK.
Now click on Start and find out Control Panel. :) Is there Control Panel anymore? May be not. Yes, you have hidden your Control Panel successfully.

Note: If you want to get back the Control Panel again then you should just follow the above steps. And need to change in the fourth step. You clicked on Enable in the fourth step. Now you need to click on Not Configured to get back your Control Panel. After clicking on Not Configured again you need to click on Apply and then OK. Thus you will get back your Control Panel again.