Wednesday, June 17, 2015

Linear search algorithm for CSE students


Linear search algorithm
Here DATA is an array with N elements and ITEM is to search from the array using linear search algorithm.

1. Repeat for J=0 to N-1
       if (ITEM==DATA[ J ]) then
          Set K=J+1;
          Print item found at position K
          Set FLAG=1;
       end of if
   end of for-loop
2. if (FLAG==0) then
      print item not found

Example 1.1
Let consider an array DATA[ ] where 3, 33, 1, 7 & 3 is stored, so N will be 5 in this case. If ITEM is 3, then find out 3 from the array using linear search algorithm.

Iteration
J=0, N=5, ITEM=3, FLAG=0, K=0

Step 01
for(j=0; j<N; j++)
as j=0 & n=5, so the condition j<n is true
   if (ITEM==DATA[ J ])
   as item=3 and data[0]=3, so the condition item==data[j] is true
      k=0+1=1
      print 'item is found at position 1'
      flag=1
if(flag==0)
as flag=1 now, so the condition is false

Step 02
j=1, n=3, k=1, flag=1

for(j=0; j<N; j++)
as j=1 & n=5, so the condition j<n is true
   if (ITEM==DATA[ J ])
   as item=3 and data[1]=33, so the condition item==data[j] is false
     
if(flag==0)
as flag=1 now, so the condition is false

Step 03
j=2, n=3, k=1, flag=1

for(j=0; j<N; j++)
as j=2 & n=5, so the condition j<n is true
   if (ITEM==DATA[ J ])
   as item=3 and data[2]=1, so the condition item==data[j] is false
     
if(flag==0)
as flag=1 now, so the condition is false

Step 04
j=3, n=3, k=1, flag=1

for(j=0; j<N; j++)
as j=3 & n=5, so the condition j<n is true
   if (ITEM==DATA[ J ])
   as item=3 and data[3]=7, so the condition item==data[j] is false
     
if(flag==0)
as flag=1 now, so the condition is false

Step 05
j=4, n=3, k=1, flag=1

for(j=0; j<N; j++)
as j=4 & n=5, so the condition j<n is true
   if (ITEM==DATA[ J ])
   as item=3 and data[4]=3, so the condition item==data[j] is true
      k=4+1=5
      print 'item is found at position 5'
      flag=1
     
if(flag==0)
as flag=1 now, so the condition is false

Step 06
j=5, n=3, k=1, flag=1

for(j=0; j<N; j++)
as j=5 & n=5, so the condition j<n is false
   exit for loop
     
if(flag==0)
as flag=1 now, so the condition is false

Recommended posts...

Advertisement


Wednesday, June 10, 2015

C program to input string and count the characters


The C program given below is able to get input string type data from user. For example: you can input a word or a line. After running the program, first of all a message will appear asking to provide string type data.

If you input something like I am a good boy. then that line will be stored into an array by the gets() function. And soon the length will be counted by the strlen() function and the number of characters will be stored into an integer type variable length.

Remember the program will count the number of characters including spaces, punctuation, special symbols and all others. We have to count the number of characters because later we will print that line or word using a for-loop.

But, we can also print that line using the puts() function simply. Then we have to replace 25th to 28th number line by a single line puts(msg);
/*----------------------------
|C program to input a sentence|
-----------------------------*/
#include <stdio.h>
#include <string.h>
int main(){
    //declaring an integer variable
    int i;

    //declaring an character type arraye
    char msg[100];

    //message to enter the sentencei
    printf("Enter a sentence: ");

    //getting data into msg array
    gets(msg);

    //defining the number of character
    int length = strlen(msg);

    //Displaying the number of character
    printf("There are %d characters!!\n",length);

    //for-loop to display the data
    for(i=0; i<=length; i++){
        printf("%c",msg[i]);
    }
}


Advertisement

Wednesday, June 3, 2015

C program to shutdown a windows pc


The c program given below is able to shutdown a windows pc. When you will run the program, then you will be asked to provide your choice. Actually a message Shutdown PC? (Y/N): will appear on the command prompt box.

That means you have press Y or N. If you press y (both in small and capital letter will do the same), then the computer system will shut down soon. But if you press n, then another message will be displayed. Similarly if you press anything else except y/n then another message will be displayed.
//This C program is able to shutdown a Windows PC
//But you have to decide by pressing y/Y
#include <stdio.h>
#include <stdlib.h>

int main(){
    //Declaring variable
    char decision;

    //Displaying message
    printf("Shutdown PC? (Y/N): ");

    //Getting decision
    scanf("%c", &decision);

    //Taking action
    if(decision == 'y' || decision == 'Y'){
        system("C:\\WINDOWS\\System32\\shutdown /s");
    } else if(decision == 'n' || decision == 'N'){
        printf("Okay, close the window!\n\n");
    } else {
        printf("You haven't pressed Y/N\n\n");
    }

    return 0;
}

Let's see how the above program works!
1. The first two lines of the program is just comments. Similarly all other lines started with double slash (//) is considered as comments.

2. In the third and fourth line there I have included two header files names stdio.h and stdlib.h
Learn what is header file in c programming.

3. In the sixth line there has started the main function of the c program and ended at the line number 26.

4. In the eighth line there I have declared a character type variable named decision, where the decision flag character will be stored after providing by a user. And depending on this flag character, the rest of the codes will be executed.

5. By the 10th line the program will simply display a message to input the choice of the user. And by the 14th line the input will be stored into the variable decision.

6. In the 17th line there is an if condition that will first check if there is y or Y into the variable. If there found y into the variable, then the 18th line will be executed and the computer will shut down soon. Similarly by the 19th line it will checked if there is n or N into the decision variable. If found then the message from the 20th line will be displayed.

Otherwise, the message from the 22nd line will be displayed.

Advertisement

Saturday, May 30, 2015

4. Hello world apps in laravel


In the previous three posts we have installed both composer and laravel, and configured the necessary settings so that we can work with laravel. Now in this tutorial we will create our first laravel application. Obviously it will very simple and tiny, but another step to enter the world of laravel. The application we will create will output some texts only as I have said before. Let's start to work.
 Step 01  Create a new directory inside htdocs
Go to the xampp installation folder, then open the htdocs folder and create a new folder inside it. For example: laraApps.

 Step 02  Change the directory to xampp installation drive
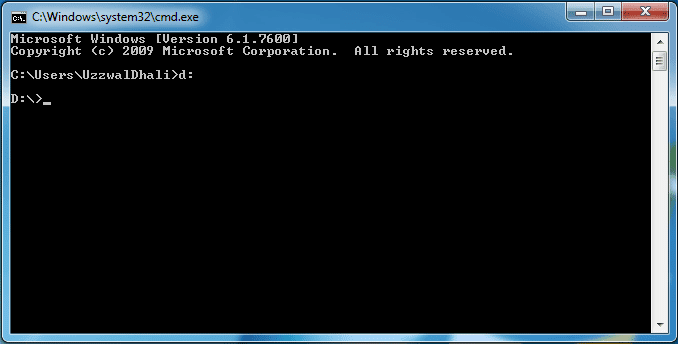
Open the run command prompt and type the drive letter as showed in the image below. For example: if you install xampp in D drive then you have to type d: and need to press the Enter Key.
So, now you are in D drive.

 Step 03  Change the directory to the newly created apps folder
Now we need to change the directory to the folder we have already created inside the htdocs folder. So, we need to type the command cd D:\xampp\htdocs\LaravelApps and also need to press the Enter Key.

 Step 04  Creating new application
Now type the command line laravel new myBlog and hit the Enter Key to create a new application named myBlog. You can try another name as you like.

After pressing the Enter Key, the system will do the listed things below...
1. Will craft the application
2. Will generate optimized class loader
3. Will compile common classes
4. Will set an application key by default
5. Will display the message that application is ready
It will take maximum five minutes to complete all above processes.

 Step 05  Open a browser
Now open a browser and type localhost/LaravelApps, you will get a page of directory. There you will find the newly created application myBlog, you have to click on that.

 Step 06  Get the welcome message
After clicking on the folder myBlog, you will get another folder named public. After clicking on the public folder, the Laravel welcome message will be displayed.

 Step 07  Get the directory
Now go to the directory D:\xampp\htdocs\LaravelApps\myBlog\app\Http\Controllers, there you will get a php file named WelcomeController.php. Open this .php file in an editor like notepad++, netbeans etc and comment out the line number 33. Add another line after that echo "Hello World"; and save the document. Finally reload the page you have opened, you will must get your own defined welcome message Hello World.

So, you have successfully created your first hello word application using laravel.
« Previous Tutorial || Next Tutorial »

Advertisement

Friday, May 29, 2015

3. Configure laravel path globaly

After completing the installation of laravel and composer, you have to change the path following the steps given below. Otherwise laravel won't work.
 Step 01  Get the directory
Find out laravel.bat file from the directory  C:\Users\Uzzwal Dhali\AppData\Roaming\Composer\vendor\bin. If you don't fond the AppData folder then change the settings like this. However, we need the directory, copy that.

 Step 02  Change the path
Now go to Start, right click on Computer / My Computer - a pop-up window will open. Click on Properties, then go to Advanced system settings - again a pop-up window will open, now click on Environmental Variables...

After clicking on Environmental Variables... , another pop-up window will open. Now select the line Path and click on the button Edit...

After clicking on the edit button, a pop-up window will open. Click on the text of the Variable value: and press the buttons Ctrl+A together and paste the path you have copied before in the first step.

 Step 03  Check Laravel if it is working or not
Press Windows Key+R together, the run command box will open. Now type cmd as the run command and press the Enter Key, the command prompt will open.

Now type Laravel and press the Enter Key, you will get something as shown in the image given bellow. It means the Laravel is working in your computer system perfectly.


« Previous Tutorial
Next Tutorial »


Advertisement

Friday, May 22, 2015

2. Installing laravel in windows computer

To work with laravel you must install both php composer and laravel. From the previous post, you have learned to install php composer. Now by this post you will learn to install laravel.
 Step 01  Get the command line
Go to the link http://laravel.com/docs/5.0#install-laravel and copy the command line composer global require "laravel/installer=~1.1"

 Step 02  Open command prompt and install laravel
Press Windows Key+R together to open the run command box. Now type cmd as run command and press the Enter Key. Paste the above command line you have copied and press the Enter Key. Soon the installation will start, but it will take few moments to be installed completely.

After completion you will get messages like the image given below.


« Previous Tutorial
Next Tutorial »


Advertisement

Sunday, May 17, 2015

Bubble sort program in java language


Bubble sorting program using java programming language
The java program given below is a bubble sort program, which is able to sort a collection of integer type numbers provided by the user. After running the program, the user will be asked to provide limit. That means, how many data he/she want to store. The 8th line of the program will display a message saying, "Enter the limit: ".

After providing the limit, it will be stored into an integer type variable limit by the 14th line. But, if we want to get any input then we must have to create Scanner Object as I have done by the 11th line. And we also import the Scanner package as like as the first line. In the 11th line I have created an Scanner Object named input, but you may name it anything as you like. As I have named it input, that's why I have used int limit = input.nextInt(); to store the limit.

By the 17th line, the user will be asked to store the data into the array. As I need to store data into an array, that's why I have declared an integer type array by the 20th line. In 23rd line there is a for-loop to store data into the array.
java program,bubble sorting program
import java.util.Scanner;
public class bubbleSort{
 public static void main(String args[]){
  //Declaring variables
  int i, j, temp;

  //Displaying message
  System.out.print("Enter the limit: ");

  //Creating scanner object
  Scanner input = new Scanner(System.in);
  
  //Storing the limit into variable
  int limit = input.nextInt();
  
  //Displaying message
  System.out.print("Enter the numbers: ");

  //Declaring integer type array
  int num[] = new int[limit];
  
  //for-loop for storing data into the array
  for(i=0; i<limit; i++){
   num[i] = input.nextInt();
  }
  
  //Displaying message
  System.out.print("The unsorted data into the array: ");

  //for-loop for displaying the unsorted data
  for(i=0; i<limit; i++){
   System.out.print(num[i]+", ");
  }
  
  //for-loop to sort the entered data
  for(i=0; i<limit; i++){
   for(j=0; j<limit-1; j++){
    if(num[j] > num[j+1]){
     //Data Swapping
     temp = num[j];
     num[j] = num[j+1];
     num[j+1] = temp;
    }
   }
  }
  
  //Displaying message
  System.out.print ("\nThe sorted data into the array: ");

  //for-loop for displaying the sorted data
  for(i=0; i<limit; i++){
   System.out.print(num[i]+", ");
  }
 }
}

Advertisement

Saturday, May 16, 2015

Binary search program in java


Operations of the java program given below
The java program given below is a binary search program. When you will run the program, then you will be asked to provide the limit. The 5th line is to show the message.

In the 8th line a scanner object input has been created, otherwise we couldn't input anything using keyboard. And most importantly we have to import the packages as like as the first line.

By the 11th line an integer type data will be stored into a variable limit. We have to use limit to define how many data we will store into the array.

Using the 14th line we will again display a message to provide the items/data. 

import java.util.*;
public class bsa{
 public static void main(String args[]){
  //Message to input the limit
  System.out.print("Enter the limit: ");

  //Creating scanner object
  Scanner input = new Scanner(System.in);

  //Getting input into the variable limit
  int limit = input.nextInt();

  //Message to provide the items
  System.out.print("Enter the items: ");

  //Declaring int type array
  int data[] = new int[limit];

  //Storing data into an array
  for(int i=0; i<limit; i++){
   data[i] = input.nextInt();
  }

  //Message to provide the expected item
  System.out.print("Enter an item to search: ");

  //Storing expected item into variable
  int searchItem = input.nextInt();

  //Initializing beginning and end
  int beg = 1, end = limit;

  //Defining the mid
  int mid = (beg + end)/2;

  //While loop to find out the data
  while(beg <= end && data[mid] != searchItem){
   if(searchItem < data[mid]){
    end = mid - 1;
   } else {
    beg = mid + 1;
   }

   mid = (beg + end)/2;
  }

  //Increasing the array position by 1
  int arrayPos = mid + 1;

  //If statement to display message if data found or not
  if(data[mid] == searchItem){
   System.out.println("Data found at position: "+arrayPos);
  } else {
   System.out.println("Data not found!!!");
  }
 }
}

Advertisement

Thursday, May 14, 2015

Linear search program in java for character type data


The java program given below is capable to perform linear search for characters. When you will run the program then you will be asked to provide the limit, that means how many characters do you want to provide. After providing the limit, you will be asked to provide the characters one by one.

And then you will be asked to provide a single character that you want to search. After providing the second for-loop of the program will check if there is the expected character. If found then a message will be displayed saying, "The character found at position: n" and if not found, then another message will be displayed saying, "The character  x has not found!!!"

import java.util.*;
public class charSearch{
 public static void main(String args[]){
  //DECLARING AN INTEGER TYPE VARIABLE
  int flag=0;

  //CREATING SCANNER OBJECT
  Scanner input = new Scanner(System.in);

  //MESSAGE TO INPUT THE LIMIT
  System.out.print("Enter the limit: ");

  //GETTING INPUT
  int limit = input.nextInt();

  //DECLARING AN STRING TYPE ARRAY
  char chars[] = new char[limit];

  //MESSAGE TO INPUT CHARACTERS
  System.out.print("Input the characters now: ");

  //STORING THE CHARACTERS INTO AN ARRAY
  for(int i=0; i<limit; i++){
   chars[i] = input.next().charAt(0);
  }

  //MESSAGE TO INPUT A CHARACTER TO SEARCH
  System.out.print("Enter the character you want to search: ");

  //STORING THE CHARACTER INTO VARIABLE
  char searchChar = input.next().charAt(0);

  //CHECKING THE EXPECTING CHARACTER INTO THE ARRAY
  for(int j=0; j<limit; j++){
   if(chars[j]==searchChar){
    //SETTING THE POSITION FOR THE CHARACTER
    int k = j+1;
    //DISPLAYING MESSAGE IF THE EXPECTED CHARACTER FOUND
    System.out.println("The character found at position: "+k);
    //SETTING FLAG=1 IF THE CHARACTER FOUND
    flag = 1;
   }
  }

  //DISPLAYING MESSAGE IF THE EXPECTED CHARACTER DOESN'T EXIST
  if(flag==0){
   System.out.println("The character "+searchChar+" has not found!!!");
  }
 }
}

Monday, May 11, 2015

Linear search program in java for float type data

The java program given below is able to search a float type number from an array. When you will run the program, then first of all you will be asked to provide a number that will be stored into a float type variable itemNumber.

After providing the number/limit, another message will be displayed asking the numbers you want to store. And the numbers will be stored one by one into a float type array numbers[].

Then another message will appear asking what do you want to search. After providing a float type number, it will be compared with each number stored into the array. If match, a message will be displayed saying "Item has found at position: 2", otherwise a message will be displayed saying "Item has not found".

Most importantly, if the item found in three location then the message "Item has found... " will be displayed three times.

import java.util.*;
public class floatSearch{
 public static void main(String args[]){
  //DECLARING VARIABLES
  int j, flag=0;

  //CREATING SCANNER OBJECT
  Scanner input = new Scanner(System.in);

  //ASKING TO PROVIDE THE NUMBER OF ITEM
  System.out.print("Enter the number of Item: ");

  //GETTING INPUT FROM KEYWORD
  int itemNumber = input.nextInt();

  //ASKING TO PROVIDE THE ITEMS
  System.out.print("Enter the items one by one: ");

  //DECLARING AN ARRAY
  float numbers[] = new float[itemNumber];

  //STORING THE ITEMS INTO AN ARRAY
  for(int i=0; i<itemNumber; i++){
   numbers[i] = input.nextFloat();
  }

  //ASKING TO PROVIDE THE DESIRED ITEM
  System.out.print("Enter the item you want to search: ");

  //STORING THE ITEM INTO VARIABLE
  float item = input.nextFloat();

  //SEARCHING AN ITEM
  for(j=0; j<itemNumber; j++){
   if(numbers[j] == item){
    int k=j+1;
    System.out.println("The item has found at position: "+k);
    flag = 1;
   }
  }

  if(flag == 0){
   System.out.println("Item has not found!!! :(");
  }
 }
}

Sunday, May 10, 2015

Linear search program in java for integer type data


The java program given below is able to search an integer type number from an array. When you will run the program, then first of all you will be asked to provide a number that will be stored into an integer type variable itemNumber. This number will be considered as number of elements that you want to store into an array.

After providing the number/limit, another message will be displayed asking the numbers/elements you want to store. And the numbers will be stored one by one into an integer type array numbers[].

Then another message will appear asking what do you want to search. After providing an integer type number, it will be compared with each number stored into the array. If match, a message will be displayed saying "Item has found at position: 2", otherwise a message will be displayed saying "Item has not found".

Most importantly, if the item found in three location then the message "Item has found... " will be displayed three times.

import java.util.*;
public class linearSearch{
 public static void main(String args[]){
  //DECLARING VARIABLES
  int j, flag=0;
  
  //CREATING SCANNER OBJECT
  Scanner input = new Scanner(System.in);

  //ASKING TO PROVIDE THE NUMBER OF ITEM
  System.out.print("Enter the number of Item: ");

  //GETTING INPUT FROM KEYWORD
  int itemNumber = input.nextInt();

  //ASKING TO PROVIDE THE ITEMS
  System.out.print("Enter the items one by one: ");

  //DECLARING AN ARRAY
  int numbers[] = new int[itemNumber];

  //STORING THE ITEMS INTO AN ARRAY
  for(int i=0; i<itemNumber; i++){
   numbers[i] = input.nextInt();
  }

  //ASKING TO PROVIDE THE DESIRED ITEM
  System.out.print("Enter the item you want to search: ");

  //STORING THE ITEM INTO VARIABLE
  int item = input.nextInt();

  //SEARCHING AN ITEM
  for(j=0; j<itemNumber; j++){
   if(numbers[j] == item){
    int k=j+1;
    System.out.println("The item has found at position: "+k);
    flag=1;
   }
  }

  if(flag == 0){
   System.out.println("Item has not found!!! :(");
  }
 }
}

Advertisement

Monday, March 9, 2015

Basic design of a webpage using CSS codes


From the previous posts you have learned to create a simple webpage. You have also learned to create divs and learned to customize them using CSS. In this post I will show how to create a webpage with all basic elements like header, menu, body/content area, sidebar and footer.

 Step 01  Create some divs
You have already learned detail about most of the codes given below from the previous posts. Inside the <body> and </body> tags I have created a div with a class mainContainer. Then inside that div I have created another four divs with the classes header, menu, contentArea and footer.

These four divs are four main sections of the webpage we are going to create and they are inside the main section mainContainer.

I have also customized the parent div using some simple CSS, that I have discussed in the previous posts.
<!DOCTYPE html>
<html lang="en">
 <head>
  <meta charset="UTF-8">
  <title>iDhali</title>
  <style type="text/css">
   .mainContainer{
    margin: auto;
    width: 960px;
    border: 1px solid #333;
   }   
  </style>
 </head>

 <body>
  <div class="mainContainer">
   <div class="header">
    Hearder
   </div> <!-- End of header -->
   
   <div class="menu">
    Menu
   </div> <!-- End of menu -->
   
   <div class="contentArea">
    Content Area
   </div> <!-- End of contentArea -->
   
   <div class="footer">
    footer
   </div> <!-- End of footer -->
   
  </div>   
 </body>
</html>
 Step 02  Customizing Header of the webpage
Now we will customize the div with the class header. First of all use the CSS codes given below to customize the header part. In the CSS given below height, background-color and color is defined. Later we will customize the header finally.
.header{
 height: 120px;
 background-color: #333;
 color: #fff;
}

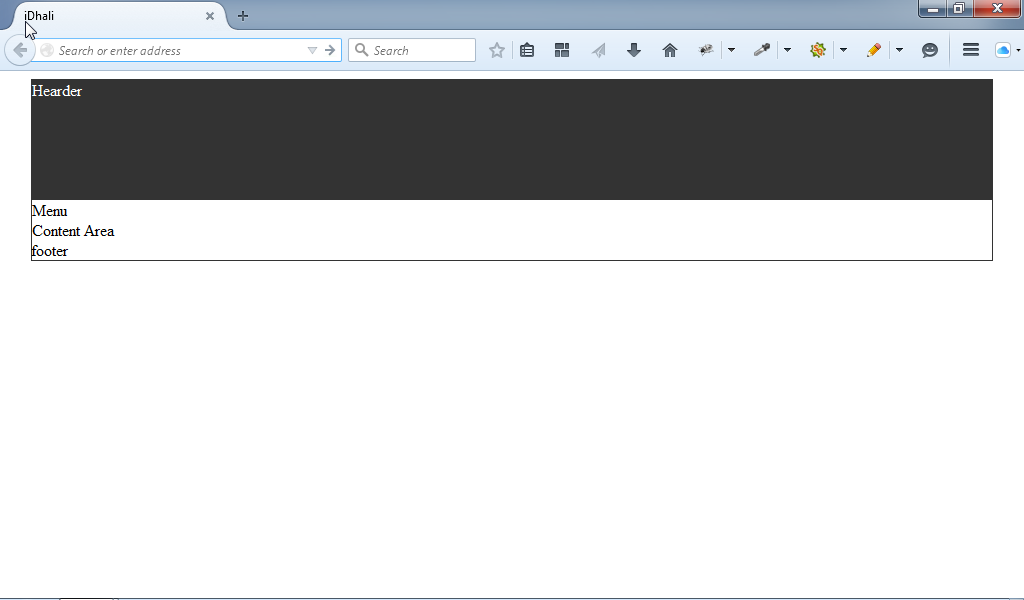
After customizing the header, the webpage will look like the image given below.


 Step 03  Customizing the footer of the webpage
After customizing the header, now we will customize the footer also. Let's use the CSS codes given below to customize the footer.
.footer{
 height: 90px;
 background-color: #333;
 color: #fff;
 text-align: center;
}

After adding the above CSS codes for the footer, the webpage will look like the image given below.


 Step 04  Adding sidebar to the existing webpage
In this step we will work with the contentArea and the menu part will be completed later. Lets create two more divs inside the div of class contentArea. And the news two divs will be with the classes content and sidebar. The change of the contentArea is given below.

The newly added two divs will be used to hold the main content of the page and to show a sidebar at the right side.

<div class="contentArea">
 <div class="content">
  Content
 </div> <!--End of Content-->
    
 <div class="sidebar">
  Sidebar
 </div>
</div> <!-- End of contentArea -->

 Step 05  Customizing the newly added two div
Now we will customize the new two divs using the CSS given below. Besides we will add some dummy texts inside the div with class content.

.contentArea{
 display: -moz-box;
 -moz-box-orient: horizontal;
 display: -webkit-box;
 -webkit-box-orient: horizontal;
}
   
.content{
 width: 660px;
}
   
.sidebar{
 width: 300px;
}

!important
contentArea is a div and inside this div there are two more divs of class content and sidebar. I have defined the 660px width for the content div and 300px width for the sidebar div. That means 660px+300px=960px

 Step 06  Add some padding
Now we have to add some padding for the container, content and sidebar. So the total CSS will be...

<style type="text/css">
 .mainContainer{
  margin: auto;
  width: 960px;
  border: 1px solid #333;
  padding: 5px;
 }

 .header{
  height: 120px;
  background-color: #333;
  color: #fff;
 }   
   
 .contentArea{
  display: -moz-box;
  -moz-box-orient: horizontal;
  display: -webkit-box;
  -webkit-box-orient: horizontal;
 }
  
 .content{
  width: 650px;
 }
   
 .sidebar{
  width: 295px;
  margin-left: 5px;
 }
   
 .footer{
  height: 90px;
  background-color: #333;
  color: #fff;
  text-align: center;
 }
</style>

Finally the webpage will look like the image given below.


« Previous Tutorial
Next Tutorial »


Friday, March 6, 2015

C program to add even numbers

The C program given below is able to add the even numbers from 1 to 100 and able to display the result. There are two C programs given below, the first one can add all the even numbers from 1 to 100. After adding all even numbers it stores the result into an integer type variable sum, later it displays the result.

!important
All the lines starting with double slash (//) are comments. I have added lots of comments, so that one can understand the program clearly.

I have used a for-loop at the 10th line to check all the numbers one by one. Inside the for-loop there is an if condition to check the value of i if it is even or not.

If any even number found then it will be added with the value of sum variable and it will be continued till the condition is true. Thus all the even numbers will be added together and will be stored into the variable sum.

//including header file
#include<stdio.h>
//main function
int main(){
    //declaring integer type variables
    int i, sum=0;

    //for-loop for chacking even numbers
    //and to add them together
    for(i=1; i<=100; i++){
        //if condition to check if it is even or not
        if(i%2==0){
            //adding all even number together
            //and saving them to the variable sum
            sum = sum + i;
        } //end of if-condition
    } //end of for-loop
    //displaying summation from variable sum
    printf("The summation is: %d",sum);
} //end of main function

The program given below is almost same to the above program, but the main difference is- user can input a starting number and a limit to check if there is any even numbers. If the program gets even numbers then all of them will be added to an integer type variable sum. And later the result will be displayed as like as the above program.

//including header file
#include<stdio.h>
//main function
int main(){
    //declaring integer type variables
    int i, start, limit, sum=0;

    //displaying a message to input starting number
    printf("Enter the starting number: ");
    //getting the starting number
    scanf("%d",&start);


    //displaying message to input the limit
    printf("Enter the limit: ");
    //getting the limit
    scanf("%d",&limit);

    //for-loop for chacking even numbers
    //and to add them together
    for(i=start; i<=limit; i++){
        //if condition to check if it is even or not
        if(i%2==0){
            //adding all even number together
            //and saving them to the variable sum
            sum = sum + i;
        } //end of if-condition
    } //end of for-loop
    //displaying summation from variable sum
    printf("\nThe summation of the even numbers from %d to %d is: %d",start,limit,sum);
} //end of main function

Feel free to contact with me if you have any query! Just leave a comment below, I will reply as soon as I can.


Tuesday, March 3, 2015

Customizing the margin and padding of a div

From the previous post you have learned to center a div and to customize the border. In this post I will discuss about the margin and padding.

Basically I will show how to...
»create two divs inside another div
»position them side by side
»fix the width and height for the child divs depending on the parent div's width and height
»add some margin for the child divs
»add some padding also

Our main goal is to create a full functional webpage, that's why we need to learn to customize the div very well. The margin, padding, height, width etc. are very important during designing a webpage.

Let's follow the steps given below, feel free to contact with me if you have any query.

 Step 01  Add two more divs inside the existing one
In the previous posts we have used a div with a class container. Now inside the container div we will add two more divs with class left and with id right. After adding two more divs the codes will be...

<!DOCTYPE html>
<html lang="en">
 <head>
  <meta charset="UTF-8">
  <title>iDhali</title>
  <style type="text/css">
   .container{
    margin: auto;
    width: 600px;
    height: 300px;
    border: 1px solid #333;
   }
  </style>
 </head>

 <body>
  <div class="container">
   <div class="left">
    Left BOX
   </div>
   
   <div id="right">
    Right BOX
   </div>
  </div>   
 </body>
</html>

After adding two new divs the webpage will look like the image given below. There are two lines Left BOX and Right BOX showing in the image. Because, those texts are added inside the newly added divs.

!important
We used class="container" to target the main div and we used .container to customize the div using CSS. Similarly to target the first child div I have used class="left".

But to target the second child div I have used id="right". Using both class and id we can customize any div, heading tag, paragraph etc.

To do so, we need to use .className for a class and #idName for an id. For example: for the main div we have used class="container" in the 17th line and that's why we have used .container{ in the 7th line.

But if we would use id="container" in the 17th line, then we would have to use #container{ in the 7th line.

 Step 02  Position the divs side by side
Now first of all, we will position the divs side by side. So, we have to use some more CSS to do that. The total CSS code you need is given below.

<style type="text/css">
 .container{
  margin: auto;
  width: 600px;
  height: 300px;
  border: 1px solid #333;
 }
 
 .left{
  border: 1px solid red;
  float: left;
 }
 
 #right{
  border: 1px solid blue;
  float: right;
 }
</style>

After adding the CSS codes for the new divs the webpage will look like the image given below.


!important
For the first child box I have used 1px red color border and for the second child box I have used 1px blue color border.

The first child div is floated at the left side using the CSS codes float: left; similarly the second child box is floated at the right side using the CSS codes float: right;

 Step 03  Adding width and height for the new divs
Now add width: 298px and height: 298px for the new divs. After adding the width and height, the webpage will look like the image given below.


!important
The main div's width was 600px and height was 300px. We have added two new divs inside the container div. Remember the width of the container div is 600px. So, we can keep two divs of 300px width. But why I am using the width 298px instead of 300px?

There is a border of 1px! Don't forget that. 1px left border+298px width+1px right border=300px

That's why I have used 298px width. For the same reason, I have used 298px height also. You should try once 300px to see what happens actually.

 Step 04  Adding margin for the left div
Now we will add 5px margin for the left div. So, we have to add another line margin: 5px; with the existing CSS codes we have used for the left div. After adding the margin the webpage will look like the image below.

But alas! the divs are broken, why?


!important
Because, there is not sufficient space inside the parent div of class container. So, the width and height of the child divs should be decreased.

5px left margin+1px left border+288px+1px right border+5px right margin will be the new calculation. So the CSS should be.

.left{
 border: 1px solid red;
 float: left;
 width: 288px;
 height: 288px;
 margin: 5px;
}

#right{
 border: 1px solid blue;
 float: right;
 width: 288px;
 height: 288px;
 margin: 5px;
}

After adding the above CSS, the webpage will look like the image given below.


more...
Look, the distance of the child divs is looking odd. Because, in each side the margin is 5px, so the distance of the divs is 10px (5px right margin of the left div+5px left margin of the right div=10px).

It should be 5px like all other margin, then it will look fine. So, customize the div's CSS again following the next step.

 Step 05  More customization
Change the width of the left div to 290.5px, as we need to decrease the margin 2.5 px from the right side, so the another 2.5px will be added with the width.

5px left margin+1px left border+290.5px+1px right border+2.5px right margin = 300px

Similarly the calculation for the right div will be...
2.5px left margin+1px left border+290.5px+1px right border+5px right margin = 300px

So, finally the distance between the two divs will be 5px (2.5px right margin of left div + 2.5px left margin of right div = 5px) and the webpage will look like...

Finally the CSS codes will be...
.container{
 margin: auto;
 width: 600px;
 height: 300px;
 border: 1px solid #333;
}

.left{
 border: 1px solid red;
 float: left;
 width: 290.5px;
 height: 288px;
 margin-left: 5px;
 margin-right: 2.5px;
 margin-top: 5px;
 margin-bottom: 5px;
}

#right{
 border: 1px solid blue;
 float: right;
 width: 290.5px;
 height: 288px;
 margin: 5px 5px 5px 2.5px;
}


!important
The height, width, margin and padding value may be a fractional number like 2.5, 290.5 or 1.3 etc.

When you will use the same margin for every side (left, right, top and bottom), then the code margin: 5px; is enough to do that.


But if you want to use different margins, then you have to define the margin for every sides. For example: margin-top: 5px; , margin-right: 2.5px; etc.

Similarly you can do that by using only one line like margin: 5px 5px 5px 2.5px; Here, 2.5px is used to define the margin for the left side.

 Step 06  Add some padding for the child divs
Look at the above images, the texts inside the child divs are attached with the border. To avoid this problem we have to use some padding. Lets use padding: 5px; for each div, then the webpage will look like the image given below.


Finally the CSS codes for the above page will be...
.container{
 margin: auto;
 width: 600px;
 height: 300px;
 border: 1px solid #333;
}

.left{
 border: 1px solid red;
 float: left;
 width: 280.5px;
 height: 278px;
 margin-left: 5px;
 margin-right: 2.5px;
 margin-top: 5px;
 margin-bottom: 5px;
 padding: 5px;
}

#right{
 border: 1px solid blue;
 float: right;
 width: 280.5px;
 height: 278px;
 margin: 5px 5px 5px 2.5px;
 padding: 5px;
}
Have you noticed?
I have decreased 10px height and 10px width of the divs.

But why?
Because, I have added new CSS padding: 5px;.
To add 5px padding now the calculation will be...

5px left margin+1px left border+5px left padding+280.5px+5px right padding+1px right border+2.5px right margin = 300px width

And the height will be...
5px top margin+1px top border+5px top padding+278px+5px bottom padding+1px margin+5px bottom margin = 300px height

« Previous Tutorial
Next Tutorial »


Monday, March 2, 2015

Customizing position and border of a div using CSS

Look at the image given below, this is the webpage you have learned to create from the previous post. There is only a box of 600px by 300px in the page. We used a <div> and some simple CSS only to create this box.

From this post you will learn some more customization of the div, that will be so helpful during creating a full webpage later. Our main goal is to create a full functional and standard website that will be responsive also.

This series is not to teach you all of the HTML or CSS and so on. But the most important and essential parts will be discussed. You are requested to comment below for further query and/or suggestion.

However, the box of the page is showing at the left side. Let's see how to center the box.


 Step 01  Center the <div>
To center the <div>, we have to use margin: auto; with the existing CSS codes. So, now the total codes will be...
<!DOCTYPE html>
<html lang="en">
 <head>
  <meta charset="UTF-8">
  <title>iDhali</title>
  <style type="text/css">
   .container{
    width: 600px;
    height: 300px;
    margin: auto;
    background-color: silver;
   }
  </style>
 </head>
 
 <body>
  <div class="container">
    
  </div>  
 </body>
</html>
After adding margin: auto; the targeted div <div class="container"> will be centered like the image below.


 Step 02  Adding border to a div
Now we will add a border to the existing div, so we have to add a new line border: 1px solid #333; After adding this CSS the webpage will look like the image given below.

But the border color is mixing with the background color! So, we will avoid the background color by removing the line background-color: silver;

After removing the line, the webpage will look like...

As I am talking about the border, so I need to show some more customization about border. For example:  if you replace the line border: 1px solid #333; to border-top: 1px solid #333; then you will get a border only at the top of the box.

You may also try...
border-bottom: 1px solid #333;
border-left: 1px solid #333;
border-right: 1px solid #333;

But, you need to use only one of them. Margin and Padding will be discussed in the next tutorial.

Let me know your feelings about the writings so that I can understand your expectation and/or satisfaction. Leave a comment below for further query and/or any suggestion.

« Previous Tutorial
Next Tutorial »


Sunday, March 1, 2015

Function in C program to calculate factorial of a number

The C program given below is able to calculate the factorial of a number. After running the program, you will be asked to provide a number, then you will get the factorial of that.
#include<stdio.h>
int factorial(int num);

int main(){
    //declaring integer type variable
    int num;

    //displaying message to get input
    printf("Enter your number: ");
    //geting input from keyboard
    scanf("%d",&num);

    //displaying the result
    printf("Factorial of %d",factorial(num));
}

int factorial(int num) {
    //declaring integer type variables
    int i, fact=1;

    //for loop to calculate the Factorial
    for(i=1; i<=num; i++){
        fact = fact*i;
    }

    return fact;

}
 
...

Saturday, February 28, 2015

Adding CSS into an HTML page to customize a div


From the previous posts, you have learned to create a simple webpage. But our goal is to crate a full functional webpage. That's why we need to know to use the <div> tag. Like all other tags, every opening <div> tag will be ended with a closing </div> tag.

A <div> tag is nothing so special till using CSS (Cascading Style Sheets) for it. So we have to use CSS also. However let's follow the steps below to add a CSS Style Sheet with our existing webpage and to format <div> differently.

 Step 01  Remind the basic codes we have used before
Let's remember the codes again we have used to create a simple webpage before. But, there is nothing inside the <body> and </body> tags here.

N.B. Only the texts and/or contents inside the <body> and </body> tags will be displayed on a web browser.
<!DOCTYPE html>
<html lang="en">
 <head>
  <meta charset="UTF-8">
  <title>iDhali</title>
 </head>
 
 <body>
  
   
 </body>
</html>
 Step 02  Now add a <div> tag inside the <body> and </body> tags
Now we will add a <div> tag inside the <body> and </body> tags. But the opening <body> tag will be with an attribute class=" " and the value of the class may be anything you like. For example: the code will be like...
<!DOCTYPE html>
<html lang="en">
 <head>
  <meta charset="UTF-8">
  <title>iDhali</title>
 </head>

 <body>
  <div class="container">
   
  </div>   
 </body>
</html>
Still now the above code will display nothing on the webpage. But if you keep any text inside the <div> and </div> tags, then the texts will be displayed as usual.

 Step 03  Let's add some CSS in the page
Now we will add some CSS codes to style the <div> according to our wish. Look, I have added a class with the value container to target the <div> by CSS. Let's look the codes given below.
<!DOCTYPE html>
<html lang="en">
 <head>
  <meta charset="UTF-8">
  <title>iDhali</title>
  <style type="text/css">
   .container{
    width: 600px;
    height: 300px;
    background-color: silver;
   }
  </style>
 </head>

 <body>
  <div class="container">
   
  </div>   
 </body>
</html>

You have already noticed that I have added 7 new lines before the closing </head> tag. These are the CSS codes that will make the <div> visible in silver color and 600 X 300px in size.

After opening the HTML document in a web browser you will get an silver colored box of 600px by 300px.

Things that you should know
01. The CSS code will go inside the <head> and </head> tags.
02. CSS codes basically goes in another file named style.css, then we have to link that .css file using a line like <link rel="stylesheet" type="text/css" href="css/style.css"> and this line will also go inside the <head> and </head> tags.
03. But when we will keep the CSS codes into the HTML page, then the CSS codes will go inside the tags <style> and </style>

Description about the newly added 7 lines are given below
<style type="text/css"> is the sixth line of the above HTML document, that is used to wrap all the CSS codes. Besides </style> is the closing tag for the 6th line. All the CSS codes must be inside <style type="text/css"> and </style> tags.

.container is the 7th line of the HTML document, that is used to target the DIV with class container. Just after .container there is an opening curly brace { and at the 11th line there is also a closing curly brace }. All the customization for the div will be inside these two curly braces.

N.B. Not only using class like <div class="container">, but also we may use id like <div id="container"> to target a <div>. But then we have to use #container instead of .container to customize.

The lines 8, 9 and 10 are very simple and descriptive. The 8th line says that the width of the div will be 600px, the 9th line says that the height of the div will be 300px and finally the 10th line says that the background color of the div will be silver.

N.B. I have used silver color, you may use another color like red, green, blue etc. And most importantly you can use color code instead of the color name. For example: #d0d0d0 is the color code for silver color. Let's know the basic color codes.


More customization of a div will be described in the next post. Stay tuned to read the next post. Must leave a comment if it is helpful for you.

« Previous Tutorial
Next Tutorial »


Advertisement

Tuesday, February 24, 2015

Detail about the heading tags


Heading Tags

h1, h2, h3, h4, h5 and h6 are six heading tags.  <h1> defines the most important heading, where <h6> defines the least important heading. Examples are given below...

Example of Heading 1

Example of Heading 2

Example of Heading 3

Example of Heading 4

Example of Heading 5
Example of Heading 6


Though different heading tags represent the texts in different sizes, but you shouldn't use heading tags for text's size issue. The heading tags should be used depending on the importance of the text. For example the title of a post/article should go inside the <h1> and </h1>tags. Similarly, the sub-heading basically the second most important title of an article should go inside the <h2> and </h2> tags.

When you will keep some text inside the <h1> and </h1> tags, then the search engine will recognize the text as the most important text. So, heading tags are used for SEO purpose. But all the text should not go inside the header tags.

Only the important texts like keywords may go inside the heading tags.


<u> tag for underlined text

In html <u> tag is used to make the texts underlined. If you keep any text inside the <u> and </u> tags then the texts will be underlined when it will be displayed in a web browser.


<i> tag for italic text

Texts inside the <i> and </i> tags will be displayed as italic text in the web browsers.


<b> tag for bold text

Texts inside the <b> and </b> tags will be displayed as bold text.


<p> tag for paragraph

Texts to represent as paragraph will go inside the <p> and </p> tags.


<br /> tag for line break

Besides, the <br/> tag is used to break a line. Content (may be texts, images etc.) after the <br /> tag will be displayed in the next line.

» Learn more text formatting

« Previous Tutorial
Next Tutorial »