Monday, March 9, 2015

Basic design of a webpage using CSS codes


From the previous posts you have learned to create a simple webpage. You have also learned to create divs and learned to customize them using CSS. In this post I will show how to create a webpage with all basic elements like header, menu, body/content area, sidebar and footer.

 Step 01  Create some divs
You have already learned detail about most of the codes given below from the previous posts. Inside the <body> and </body> tags I have created a div with a class mainContainer. Then inside that div I have created another four divs with the classes header, menu, contentArea and footer.

These four divs are four main sections of the webpage we are going to create and they are inside the main section mainContainer.

I have also customized the parent div using some simple CSS, that I have discussed in the previous posts.
<!DOCTYPE html>
<html lang="en">
 <head>
  <meta charset="UTF-8">
  <title>iDhali</title>
  <style type="text/css">
   .mainContainer{
    margin: auto;
    width: 960px;
    border: 1px solid #333;
   }   
  </style>
 </head>

 <body>
  <div class="mainContainer">
   <div class="header">
    Hearder
   </div> <!-- End of header -->
   
   <div class="menu">
    Menu
   </div> <!-- End of menu -->
   
   <div class="contentArea">
    Content Area
   </div> <!-- End of contentArea -->
   
   <div class="footer">
    footer
   </div> <!-- End of footer -->
   
  </div>   
 </body>
</html>
 Step 02  Customizing Header of the webpage
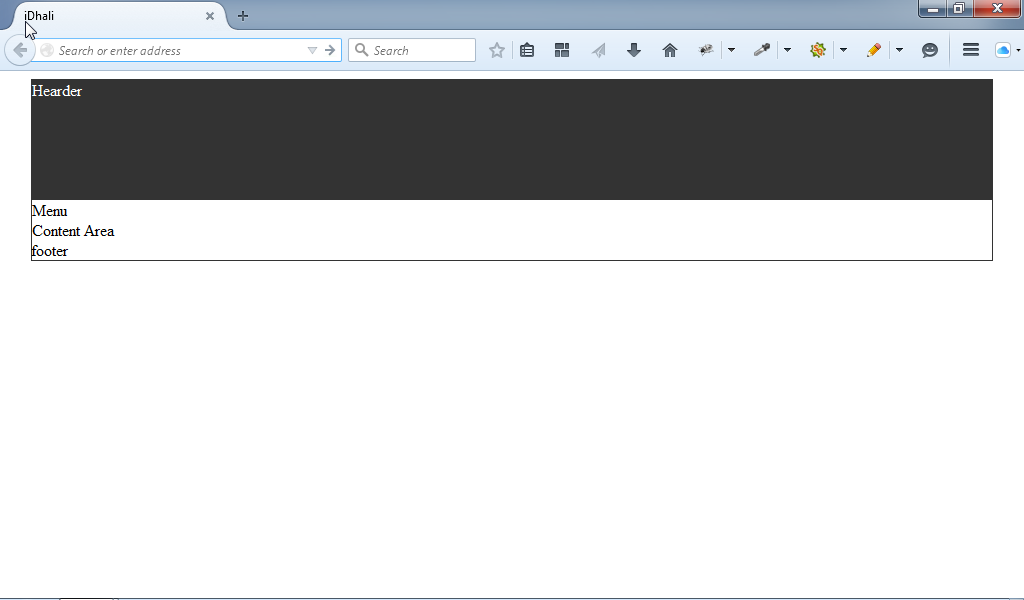
Now we will customize the div with the class header. First of all use the CSS codes given below to customize the header part. In the CSS given below height, background-color and color is defined. Later we will customize the header finally.
.header{
 height: 120px;
 background-color: #333;
 color: #fff;
}

After customizing the header, the webpage will look like the image given below.


 Step 03  Customizing the footer of the webpage
After customizing the header, now we will customize the footer also. Let's use the CSS codes given below to customize the footer.
.footer{
 height: 90px;
 background-color: #333;
 color: #fff;
 text-align: center;
}

After adding the above CSS codes for the footer, the webpage will look like the image given below.


 Step 04  Adding sidebar to the existing webpage
In this step we will work with the contentArea and the menu part will be completed later. Lets create two more divs inside the div of class contentArea. And the news two divs will be with the classes content and sidebar. The change of the contentArea is given below.

The newly added two divs will be used to hold the main content of the page and to show a sidebar at the right side.

<div class="contentArea">
 <div class="content">
  Content
 </div> <!--End of Content-->
    
 <div class="sidebar">
  Sidebar
 </div>
</div> <!-- End of contentArea -->

 Step 05  Customizing the newly added two div
Now we will customize the new two divs using the CSS given below. Besides we will add some dummy texts inside the div with class content.

.contentArea{
 display: -moz-box;
 -moz-box-orient: horizontal;
 display: -webkit-box;
 -webkit-box-orient: horizontal;
}
   
.content{
 width: 660px;
}
   
.sidebar{
 width: 300px;
}

!important
contentArea is a div and inside this div there are two more divs of class content and sidebar. I have defined the 660px width for the content div and 300px width for the sidebar div. That means 660px+300px=960px

 Step 06  Add some padding
Now we have to add some padding for the container, content and sidebar. So the total CSS will be...

<style type="text/css">
 .mainContainer{
  margin: auto;
  width: 960px;
  border: 1px solid #333;
  padding: 5px;
 }

 .header{
  height: 120px;
  background-color: #333;
  color: #fff;
 }   
   
 .contentArea{
  display: -moz-box;
  -moz-box-orient: horizontal;
  display: -webkit-box;
  -webkit-box-orient: horizontal;
 }
  
 .content{
  width: 650px;
 }
   
 .sidebar{
  width: 295px;
  margin-left: 5px;
 }
   
 .footer{
  height: 90px;
  background-color: #333;
  color: #fff;
  text-align: center;
 }
</style>

Finally the webpage will look like the image given below.


« Previous Tutorial
Next Tutorial »


Friday, March 6, 2015

C program to add even numbers

The C program given below is able to add the even numbers from 1 to 100 and able to display the result. There are two C programs given below, the first one can add all the even numbers from 1 to 100. After adding all even numbers it stores the result into an integer type variable sum, later it displays the result.

!important
All the lines starting with double slash (//) are comments. I have added lots of comments, so that one can understand the program clearly.

I have used a for-loop at the 10th line to check all the numbers one by one. Inside the for-loop there is an if condition to check the value of i if it is even or not.

If any even number found then it will be added with the value of sum variable and it will be continued till the condition is true. Thus all the even numbers will be added together and will be stored into the variable sum.

//including header file
#include<stdio.h>
//main function
int main(){
    //declaring integer type variables
    int i, sum=0;

    //for-loop for chacking even numbers
    //and to add them together
    for(i=1; i<=100; i++){
        //if condition to check if it is even or not
        if(i%2==0){
            //adding all even number together
            //and saving them to the variable sum
            sum = sum + i;
        } //end of if-condition
    } //end of for-loop
    //displaying summation from variable sum
    printf("The summation is: %d",sum);
} //end of main function

The program given below is almost same to the above program, but the main difference is- user can input a starting number and a limit to check if there is any even numbers. If the program gets even numbers then all of them will be added to an integer type variable sum. And later the result will be displayed as like as the above program.

//including header file
#include<stdio.h>
//main function
int main(){
    //declaring integer type variables
    int i, start, limit, sum=0;

    //displaying a message to input starting number
    printf("Enter the starting number: ");
    //getting the starting number
    scanf("%d",&start);


    //displaying message to input the limit
    printf("Enter the limit: ");
    //getting the limit
    scanf("%d",&limit);

    //for-loop for chacking even numbers
    //and to add them together
    for(i=start; i<=limit; i++){
        //if condition to check if it is even or not
        if(i%2==0){
            //adding all even number together
            //and saving them to the variable sum
            sum = sum + i;
        } //end of if-condition
    } //end of for-loop
    //displaying summation from variable sum
    printf("\nThe summation of the even numbers from %d to %d is: %d",start,limit,sum);
} //end of main function

Feel free to contact with me if you have any query! Just leave a comment below, I will reply as soon as I can.


Tuesday, March 3, 2015

Customizing the margin and padding of a div

From the previous post you have learned to center a div and to customize the border. In this post I will discuss about the margin and padding.

Basically I will show how to...
»create two divs inside another div
»position them side by side
»fix the width and height for the child divs depending on the parent div's width and height
»add some margin for the child divs
»add some padding also

Our main goal is to create a full functional webpage, that's why we need to learn to customize the div very well. The margin, padding, height, width etc. are very important during designing a webpage.

Let's follow the steps given below, feel free to contact with me if you have any query.

 Step 01  Add two more divs inside the existing one
In the previous posts we have used a div with a class container. Now inside the container div we will add two more divs with class left and with id right. After adding two more divs the codes will be...

<!DOCTYPE html>
<html lang="en">
 <head>
  <meta charset="UTF-8">
  <title>iDhali</title>
  <style type="text/css">
   .container{
    margin: auto;
    width: 600px;
    height: 300px;
    border: 1px solid #333;
   }
  </style>
 </head>

 <body>
  <div class="container">
   <div class="left">
    Left BOX
   </div>
   
   <div id="right">
    Right BOX
   </div>
  </div>   
 </body>
</html>

After adding two new divs the webpage will look like the image given below. There are two lines Left BOX and Right BOX showing in the image. Because, those texts are added inside the newly added divs.
!important
We used class="container" to target the main div and we used .container to customize the div using CSS. Similarly to target the first child div I have used class="left".

But to target the second child div I have used id="right". Using both class and id we can customize any div, heading tag, paragraph etc.

To do so, we need to use .className for a class and #idName for an id. For example: for the main div we have used class="container" in the 17th line and that's why we have used .container{ in the 7th line.

But if we would use id="container" in the 17th line, then we would have to use #container{ in the 7th line.

 Step 02  Position the divs side by side
Now first of all, we will position the divs side by side. So, we have to use some more CSS to do that. The total CSS code you need is given below.

<style type="text/css">
 .container{
  margin: auto;
  width: 600px;
  height: 300px;
  border: 1px solid #333;
 }
 
 .left{
  border: 1px solid red;
  float: left;
 }
 
 #right{
  border: 1px solid blue;
  float: right;
 }
</style>

After adding the CSS codes for the new divs the webpage will look like the image given below.


!important
For the first child box I have used 1px red color border and for the second child box I have used 1px blue color border.

The first child div is floated at the left side using the CSS codes float: left; similarly the second child box is floated at the right side using the CSS codes float: right;

 Step 03  Adding width and height for the new divs
Now add width: 298px and height: 298px for the new divs. After adding the width and height, the webpage will look like the image given below.


!important
The main div's width was 600px and height was 300px. We have added two new divs inside the container div. Remember the width of the container div is 600px. So, we can keep two divs of 300px width. But why I am using the width 298px instead of 300px?

There is a border of 1px! Don't forget that. 1px left border+298px width+1px right border=300px

That's why I have used 298px width. For the same reason, I have used 298px height also. You should try once 300px to see what happens actually.

 Step 04  Adding margin for the left div
Now we will add 5px margin for the left div. So, we have to add another line margin: 5px; with the existing CSS codes we have used for the left div. After adding the margin the webpage will look like the image below.

But alas! the divs are broken, why?


!important
Because, there is not sufficient space inside the parent div of class container. So, the width and height of the child divs should be decreased.

5px left margin+1px left border+288px+1px right border+5px right margin will be the new calculation. So the CSS should be.

.left{
 border: 1px solid red;
 float: left;
 width: 288px;
 height: 288px;
 margin: 5px;
}

#right{
 border: 1px solid blue;
 float: right;
 width: 288px;
 height: 288px;
 margin: 5px;
}

After adding the above CSS, the webpage will look like the image given below.


more...
Look, the distance of the child divs is looking odd. Because, in each side the margin is 5px, so the distance of the divs is 10px (5px right margin of the left div+5px left margin of the right div=10px).

It should be 5px like all other margin, then it will look fine. So, customize the div's CSS again following the next step.

 Step 05  More customization
Change the width of the left div to 290.5px, as we need to decrease the margin 2.5 px from the right side, so the another 2.5px will be added with the width.

5px left margin+1px left border+290.5px+1px right border+2.5px right margin = 300px

Similarly the calculation for the right div will be...
2.5px left margin+1px left border+290.5px+1px right border+5px right margin = 300px

So, finally the distance between the two divs will be 5px (2.5px right margin of left div + 2.5px left margin of right div = 5px) and the webpage will look like...

Finally the CSS codes will be...
.container{
 margin: auto;
 width: 600px;
 height: 300px;
 border: 1px solid #333;
}

.left{
 border: 1px solid red;
 float: left;
 width: 290.5px;
 height: 288px;
 margin-left: 5px;
 margin-right: 2.5px;
 margin-top: 5px;
 margin-bottom: 5px;
}

#right{
 border: 1px solid blue;
 float: right;
 width: 290.5px;
 height: 288px;
 margin: 5px 5px 5px 2.5px;
}


!important
The height, width, margin and padding value may be a fractional number like 2.5, 290.5 or 1.3 etc.

When you will use the same margin for every side (left, right, top and bottom), then the code margin: 5px; is enough to do that.


But if you want to use different margins, then you have to define the margin for every sides. For example: margin-top: 5px; , margin-right: 2.5px; etc.

Similarly you can do that by using only one line like margin: 5px 5px 5px 2.5px; Here, 2.5px is used to define the margin for the left side.

 Step 06  Add some padding for the child divs
Look at the above images, the texts inside the child divs are attached with the border. To avoid this problem we have to use some padding. Lets use padding: 5px; for each div, then the webpage will look like the image given below.


Finally the CSS codes for the above page will be...
.container{
 margin: auto;
 width: 600px;
 height: 300px;
 border: 1px solid #333;
}

.left{
 border: 1px solid red;
 float: left;
 width: 280.5px;
 height: 278px;
 margin-left: 5px;
 margin-right: 2.5px;
 margin-top: 5px;
 margin-bottom: 5px;
 padding: 5px;
}

#right{
 border: 1px solid blue;
 float: right;
 width: 280.5px;
 height: 278px;
 margin: 5px 5px 5px 2.5px;
 padding: 5px;
}
Have you noticed?
I have decreased 10px height and 10px width of the divs.

But why?
Because, I have added new CSS padding: 5px;.
To add 5px padding now the calculation will be...

5px left margin+1px left border+5px left padding+280.5px+5px right padding+1px right border+2.5px right margin = 300px width

And the height will be...
5px top margin+1px top border+5px top padding+278px+5px bottom padding+1px margin+5px bottom margin = 300px height

« Previous Tutorial
Next Tutorial »


Monday, March 2, 2015

Customizing position and border of a div using CSS

Look at the image given below, this is the webpage you have learned to create from the previous post. There is only a box of 600px by 300px in the page. We used a <div> and some simple CSS only to create this box.

From this post you will learn some more customization of the div, that will be so helpful during creating a full webpage later. Our main goal is to create a full functional and standard website that will be responsive also.

This series is not to teach you all of the HTML or CSS and so on. But the most important and essential parts will be discussed. You are requested to comment below for further query and/or suggestion.

However, the box of the page is showing at the left side. Let's see how to center the box.


 Step 01  Center the <div>
To center the <div>, we have to use margin: auto; with the existing CSS codes. So, now the total codes will be...
<!DOCTYPE html>
<html lang="en">
 <head>
  <meta charset="UTF-8">
  <title>iDhali</title>
  <style type="text/css">
   .container{
    width: 600px;
    height: 300px;
    margin: auto;
    background-color: silver;
   }
  </style>
 </head>
 
 <body>
  <div class="container">
    
  </div>  
 </body>
</html>
After adding margin: auto; the targeted div <div class="container"> will be centered like the image below.


 Step 02  Adding border to a div
Now we will add a border to the existing div, so we have to add a new line border: 1px solid #333; After adding this CSS the webpage will look like the image given below.

But the border color is mixing with the background color! So, we will avoid the background color by removing the line background-color: silver;

After removing the line, the webpage will look like...

As I am talking about the border, so I need to show some more customization about border. For example:  if you replace the line border: 1px solid #333; to border-top: 1px solid #333; then you will get a border only at the top of the box.

You may also try...
border-bottom: 1px solid #333;
border-left: 1px solid #333;
border-right: 1px solid #333;

But, you need to use only one of them. Margin and Padding will be discussed in the next tutorial.

Let me know your feelings about the writings so that I can understand your expectation and/or satisfaction. Leave a comment below for further query and/or any suggestion.

« Previous Tutorial
Next Tutorial »


Sunday, March 1, 2015

Function in C program to calculate factorial of a number

The C program given below is able to calculate the factorial of a number. After running the program, you will be asked to provide a number, then you will get the factorial of that.
#include<stdio.h>
int factorial(int num);

int main(){
    //declaring integer type variable
    int num;

    //displaying message to get input
    printf("Enter your number: ");
    //geting input from keyboard
    scanf("%d",&num);

    //displaying the result
    printf("Factorial of %d",factorial(num));
}

int factorial(int num) {
    //declaring integer type variables
    int i, fact=1;

    //for loop to calculate the Factorial
    for(i=1; i<=num; i++){
        fact = fact*i;
    }

    return fact;

}
 
...