Friday, May 30, 2014

Change the Default Font and Their Style of Windows XP


There are lots of Computer Users who still use Windows XP though Windows 8.1 is available with a lots of features. This post is also about Windows XP Operating System. I will show here how to customize the fonts and colors of Windows Xp. Windows XP has its own Font Style and Color. The font size is fixed to 11 by default. Lets see how to change the Font Style, Font Color, Weight etc.

 Step 01  Right Click on the Desktop
Close all the applications and Right Click the mouse on the Desktop. After clicking on desktop a pop-up menu will open. Now click on Properties from the Menu. A new window will open named Display Properties.
windows xp tricks,changing windows font and color
 Step 02  Click on the Appearance Tab
There are five tabs named Themes, Desktop, Screen Saver, Appearance and Settings in the Display Properties Window. Now you have to click on the Appearance tab. Then click on Advanced Button. Advanced Button is located at the lowermost right corner of the Window. After clicking on Advanced Button another window will open named Advanced Appearance.

 Step 03  Change the Font Style and Size of Icons
Look, there is written Item: at the lowermost left side of the Advanced Appearance Window. There is selected Desktop by default and a down-arrow-key at the right side. Now click on that down-arrow-key sign and select Icon. Again click on the down-arrow-key sign of the Font: section and select your expected font.
After clicking on the down-arrow-key sign you will get the list of all fonts installed in your Computer. Look at the right side of the Font: section, there are some other options to change the font size, font color and font style. Change the font size to 12 or as you like.

You can make the text Bold or Italic or Bold Italic by the help of those two buttons named "B" and "I". After changing all, click on the OK button.

 Step 04  Change the Font Color
You need to select Menu from the ItemNow select the color as you like. There are 20 colors by default. But you may get more colors by clicking on Other... So change the color as you like and then Click on the OK button. This settings will only change the Menu Color. So, to change the Icon Font Color, you have to select Message Box from the ItemThen select your favorite color as you want. There is also 20 color only by default. But you can add more color by clicking on Other... again. Lets enjoy your customized New Look of Windows XP.


Monday, May 26, 2014

How to run a C++ program in CodeBlocks


We can run c programs in Code::Blocks just after installing that. But, to run C++ programs we have to configure Code::Blocks.

Configuring Code::Blocks is not so tough as people think. Follow the steps given below to configure Code::Blocks and to run C++ programs using that.

 Step 01  Run Code::Blocks first
First of all you have to run Code::Blocks. To run it go to Start>All Programs>Code::Blocks. Then simply click on Code::Blocks to run it.

 Step 02  Change the Settings
Now click on Settings from the menu bar, a drop-down menu will open. Now click on Compiler from the menu, a pop-up window will open. Find out the writings Have g++ follow the C++11 ISO C++ language standard [-std=c++11] and check the box showing at the beginning of this line. Then click on the OK button.

 Step 03  Compile a C++ program now
To write a new C++ program, go to File>New>Empty file or simply press Ctrl+Shift+N, a new empty file will open. Now type a simple C++ program and press F9 function key. Then a pop-up window will open to save the program. Save the program with .cpp extension.


Advertisement

C++ Program to Perform Several Mathematical Operations at a Time [C++ 03]


Objectives:
-to Perform Addition, Subtraction, Multiplication and Division at a time
-to Know when to use the command float
-to Know how to use the command float
-to Know how to use a line break
-to Learn to show several results one after another


Short description about the program:
The C++ Program given below is able to perform four mathematical operations at a time. Though it will show all the results at a time but the program will actually do that one after another. From the previous program we have learnt to add two numbers. But in this program we will run four mathematical operations. Into the fifth line of this program, we have to use two variables n1 and n2 to store two numbers we will use later. And the rest four variables add, sub, mul and div are respectively for addition, subtraction, multiplication and division. Actually the result after the mathematical operations will be kept into those variables. In this program, we have declared float type variables. Because, we will perform division that may result float type data.

 01 #include<iostream>
 02 using namespace std;
 03 int main()
 04 {
 05 float n1, n2, add, sub, mul, div;
 06 n1=5;
 07 n2=6;
 08 add=n1+n2;
 09 cout<<"The Summation is: ";
 10 cout<<add;
 11 sub=n1-n2;
 12 cout<<"\nThe Substraction is: ";
 13 cout<<sub;
 14 mul=n1*n2;
 15 cout<<"\nThe Multiplication is: "; 
 16 cout<<mul;
 17 div=n1/n2;
 18 cout<<"\nThe Division is: ";
 19 cout<<div;
 20 }

Description of the above codes

Line 05: float n1, n2, add, sub, mul, div:
This is the fifth line of the above program. We have declared six float type variables to perform the operations accurately. The operation division may result float type data. That's why we have to declare the variables as float type. Otherwise the result may not be accurate.
Line 11: sub=n1-n2:
This eleventh line is new in this program. In this line there is told to subtract n2 from n1 by the command n1-n2 and at same time the processor will keep the result into the variable sub.

In fourteenth and seventeenth lines we did almost the same. In fourteenth line we have told the processor to multiply n1 and n2 and to keep the result into the variable mul.

Later it the seventeenth line we have told the processor to divide n1 by n2 and to keep the result into the variable div.

All the rest lines are described into the previous post. In this program we have used \n to create a new line only. \n will work as like a line break as we get after pressing the Enter Key.


Another C++ Programs


Sunday, May 25, 2014

Create an Excel Sheet to Find Out the GPA of a Student of SSC Level


Look at the image given below. It's an Excel Sheet to find out the GPA of a student. I have made this Excel Sheet depending on the marks of a student of Secondary School Certificate (SSC) in Bangladesh. The most important part of this sheet is the formula to find out the Grade Point depending on obtained marks. You the most of the Computer Users may be able to make an Excel Sheet like this. I am providing the guideline step by step so that you all may be able to understand properly.
Excel Tutorials,Find Out GPA,GPA System in Excel
 Step 01  Open a New Excel Sheet
At first you have to open an Excel Sheet and then type the Subject's Names as like as the image given below. You may also type all of the First Column and the First Row.

 Step 02  Provide the Marks in the Second Column
Provide the marks in the Second Column where is written Marks. Provide various types of number as marks to understand the result.

 Step 03  Type the Formula into the C2 Cell
Now click on the third column and second row that means on the C2 cell. Then type the formula =IF(B2>=80,"A+",IF(B2>=70,"A",IF(B2>=60,"A-",IF(B2>=50,"B",IF(B2>=40,"C",IF(B2>=33,"D",IF(B2<33,"F"))))))) into the Formula Bar and press Enter from the Keyboard.

 Step 04  Drag up to C12 Cell
After pressing Enter there will be a border into the C2 cell. Look there is a point at the lowermost right corner. Now keep your mouse pointer on the point, then keep pressed the left button of the mouse and finally drag outside of the C2 cell. Drag up to C12 cell.

 Step 05  Provide the Formula for Grade Point
Again click on D2 cell and provide the formula =IF(B2>=80,"5.00",IF(B2>=70,"4.00",IF(B2>=60,"3.50",IF(B2>=50,"3.00",IF(B2>=40,"2.00",IF(B2>=33,"1.00",IF(B2<33,"0"))))) into the cell and then press Enter. And also drag up to D12 cell like before.

 Step 06  Complete the E Column
Now select E2 and E3 cells and merge them. Again select E4 and E5 and merge them again. Click on the first merged cell named E2 and type =(D2+D3)/2. Then press Enter. Thus type =(D4+D5)/2 into the cell E4. Again type =D6 into the cell E6. Now keep your mouse pointer on the point, then keep pressed the left button of the mouse and finally drag outside of the E6 cell and drag up to E12 cell.

 Step 07  Complete the Thirteenth Row
Now click on B13 cell and type =B2+B3+B4+B5+B6+B7+B8+B9+B10+B11+B12 into the Formula Bar and press Enter.  Again click on D13 and type =D2+D3+D4+D5+D6+D7+D8+D9+D10+D11+D12 and finally click on E13 cell and type =E2+E4+E6+E7+E8+E9+E10+E11+E12.

 Step 08  Find out the GPA
Now click on F2 cell and Look there is a point at the lowermost right corner. Now keep your mouse pointer on the point, then keep pressed the left button of the mouse and finally drag outside of the F2 cell. Drag up to F12 cell. Type =E13/8 into the formula bar.


Saturday, May 24, 2014

Creating Links in HTML and Format that in Different Way


Creating a Normal Link
To create a link we have to use the <a> and </a> tags with different attributes. href=" " is the basic and must use attribute to create a link. Lets see an example- <a href="http://www.idhali.com">iDhali</a> is a link, we normally use. When we will use these codes then a link will appear as like as given below...


html links,nofollow links,dofollow links
Creating a Link with a Specific Color
Now we will change the color of the link using some extra codes. Lets see the codes- <a href="http://www.idhali.com/" style="color: red;">iDhali</a>. Look, I have used a specific color to define the extra codes I have used to change the color of a link. style="color: red;" are the codes to change the color. I have used red to get the red color. You may use blue/black/white or any other codes you like.


Creating a Link with Welcome Message/Title
In this step we will create a link with Welcome Message or Title. That means when we will hover the mouse on the link then a message will appear that we will set before. Examine the example given below. Keep your mouse on the link showing below, then a message will appear. <a href="http://www.idhali.com/" style="color: green;" title="A Website to Make You Professional">iDhali</a> are the codes I have used to create the link given below. Actually the colored codes I have added to show the message.


Creating a Nofollow Link
To create a nofollow link you have to use the codes are given below. Look, I have used the attribute rel=" " inside of the opening <a> tag and the value nofollow to make the link nofollow. We always need to use the attribute inside of the opening <a> tag.

<a href="http://www.idhali.com" rel="nofollow">iDhali</a>

Creating a Dofollow Link
Creating dofollow link is almost similar to the way of creating nofollow link. To create a nofollow link you have to use the following codes given below. Look, I have used the attribute rel=" " inside of the opening <a> tag and the value dofollow to make the link dofollow. Lets, try it yourself and make a link nofollow or dofollow.

<a href="http://www.idhali.com" rel="nofollow">iDhali</a>

PREVNEXT


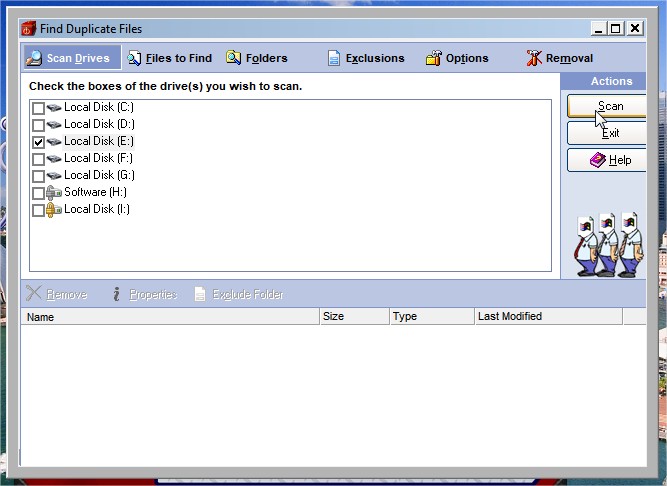
Delete the Duplicate Files to Free Up the Memory of a HDD


You may now delete the same files from your Hard Disk Drive using System Mechanic Pro application software. It's easy to find out the same file from a computer using this tiny software. So, find out the duplicate files and delete them permanently.
delete duplicate, duplicate files, free up memory
 Step 01  Run System Mechanic Pro
To delete the same files from a Computer System, there have to have installed System Mechanic Pro. Then run System Mechanic Pro. A window will open like the image given below. Now click on Eliminate Duplicate Files as shown below.
 Step 02  Scan the Duplicate Files
After clicking on Eliminate Duplicate Files, a new pop-up window will open. Now check the box beside the drive to select from which you want to find out Duplicates Files. You may also select several drives. Then click on the Scan Button as shown below.
 Step 03  Select the File You want to Delete
After a few moments search result will be available. You will be informed about the file size, created date, type and about file location. Now click on the file you want to delete. Then the Remove Option will be active. Now click on the Remove ButtonThen you will get a message, click on the OK Button.
 Step 04  Finally Delete the File
After clicking, another window will open asking the confirmation to delete the file you have selected.. Finally click on the Yes Button to delete the file. Thus delete all the duplicate files.
Researchers have calculated that ice is melting so fast that the North Pole will become on open sea in 30 years time, making it possible for ships to sail across the top of the globe.-The Telegraph(13.12.06) 


Thursday, May 22, 2014

System Mechanic Pro: Recover Your Deleted Data


System Mechanic Pro is a software to recover deleted data from any Storage Device. If you delete your data from your Computer or any other devices, then you can recover that data using System Mechanic Pro Software. If you delete your data from the Recycle Bin, even then you can get back your deleted data. Lets Download System Mechanic Pro from here. Follow the steps given below to know how to install System Mechanic Pro Software.
 Step 01  Double Click on the .exe File
At first you have double click on the .exe file of the software to run the installation. The image of .exe file is given below.
 Step 02  Click on Next for the Next Step
Then a window will appear like the image given below. Now you need to click on Next and another window will open like the next image.
 Step 03  Select the Drive Where Do You Want to Setup the Software
In this step the software will create a destination folder. By default it will create a Folder in C Drive. But you may change the directory as you like. To change the directory you have to click on Browse. That means you can select your drive where do you want to setup the System Mechanic Pro software. However, again click on Next to go to the next step. Now another window will open like the image given in the next step.
 Step 04  Confirm the Backup File Destination Directory
Select the Backup file location and click on Next to continue the installation process.
 Step 05  Uncheck Antivirus and Internet Firewall
After clicking on Next, "Select Components" window will open like the image given below. Now uncheck the "Antivirus and Internet Firewall". Because, It may slow down your computer system. Again click on Next from the window.

Just follow the "Disk Space Required". It is now 28944k. Now look at the image given below. After unchecking "Antivirus and Internet Firewall" the space has reduced here and now it is 3222k.
 Step 06  Complete the Installation Process
Again click on Next>Next>Next>Finish>OK>Yes. Then a new window will open like the image given below.
Now you need to click on "I own System Mechanic and would like to enter my User ID and Serial Number" as shown in the above image. Another new window will open like the image given below.
 Step 07  Provide the Serial Number
Now open the TXT file to get the User ID and Serial Number. Provide the User ID and Serial Number and enjoy the benefit of System Mechanic Pro and get your Deleted Data back.


Monday, May 19, 2014

How to find out Widget ID of the Gadgets in Blogger Blog


We the Blogger Blog Users use different types of Gadgets in our Blogs to enrich our Blog's Design and to make the blogs helpful for the visitors. The default templates of the Blogger Blog is not well decorated. That's why we have to change a lot to get our expected looks and way of access data. Sometimes we need to know the widget ID to modify or to do something special with it. For example: if we need to hide or unhide a gadget for a specific URL then we need to know the widget ID. Lets read the article on How to show/hide widgets in specific pages in Blogger Blog if you are interested. However, the steps to find out the Widget ID are given below.
blogger blog tutorial,find widget ID
 Step 01  Log in to Your Blogger Account
At first you need to log in to your Blogger Account. Now click on Template from the left side menu bar. Then click on Edit of the targeted Widget to know ID. Look at the image given below. In the image I have kept the mouse pointer on Edit option of Follow by Email widget. You have to do the same like me.
Exclusive Blogger Blog Tutorials, Blogging, Website, Designing
 Step 02  Find Out Widget ID
After clicking on Edit of the Widget, a pop-up window will open like the image given below. Look there is a URL in the address bar. Now click anywhere of the link and then press End Button from your Keyboard. And look, there is the Widget ID at the end after the last equal to "=" sign. This is your expected Widget ID.
Exclusive Blogger Blog Tutorials, Blogging, Website, Designing


Add a Live Chat Box in Your Blogger Blog or Website


If you have a Website or Blogger Blog, then you can communicate with your visitors adding an instant chat box in your Blog or Website. Sometimes the visitors may suffer for help from you. In this situation Instant Chat Box is so helpful for both of you. It's very easy to use. There are many Instant Chat Box available online. But I will recommend you Zopim Chat Box. Because, it is really very nice to look at and easy to use. If you add this Instant Chat Box in your Website or Blog then the visitors will be able to send you massages. And you can reply them instantly or later. When you will stay online then the visitors will be able to understand and they may communicate with you.

More advantages of Zopim Live Chat Box are listed below...
  1. You can design your own Live Chat Box.
  2. You can see visitors IP, Host Name, Country and even the Browser they are using.
  3. If any visitor spam you then you can banned him/her with IP. After that he/she won't be able to chat with you anymore.
  4. Zopim Live Chat Box is fully free in charge. You needn't pay anything to use the service.
  5. You can make maximum 8 agent to use it.
  6. If you want, you can keep yourself offline or away mode.
  7. You can see the Chat History in your Admin Panel.
  8. And lastly you can earn from it by Referral Link.
live chat box, blogger chat box,chat box
However, If you really want to communicate with the visitors then you must stay Logged in the site. If you don’t stay Logged in, visitors won't get you online. Though you are not Logged in even then the visitors will be able to leave massage for you using their e-mail. Let’s know how to set up  Zopim Instant Chat Box in your Blogger Blog or Website.
 Step 01  Provide Your Email Address and Name
At first you need to go to the Zopim Website from here, then find out the the portion like the image given below. Then provide your e-mail address into the first text input box "Email Address" and provide your name into the second text input box "Name". Then click on the button Sign Up Free.
Live Chat Box, Zopim Chat Box, Free Chat Box
 Step 02  Click on "Verify Your Email"
After signing up you will receive a Confirmation Email in your Inbox. Now check the mail and click on their link "Verify Your Email". The image is given below.
Chat Box, Live Chat Box, Instant Chat Box
 Step 03  Provide Password and Click on "Save and go to Dashboard"
After clicking on "Verify Your Email" then you have to provide a password for two times into the two text input boxes Password and Confirm Password. Then click on the button SAVE AND GO TO DASHBOARD.
Live Chat Box for Your Blog, Instant Chat Box, Chat Box for Blogger Blog
 Step 04  Provide the Information and Click on Next
Now you have to provide your First Name and Last name to complete your Profile. After providing the information, you need to click on Next.
Chat Box for Your Blog, Live Chat Box, Instant Chat Box
 Step 05  Add the Codes  into Your Website's HTML Source Code
After completing your profile you will get some codes as shown in the image below. You have to now copy the following codes and insert them into your website's HTML source code between <head> and </head> tags.
Add a Chat Box, Add Free Chat Box, Live Chat Box Free
 Step 06  Add the Codes to an HTML/JavaScript Gadget
To add this amazing Free Live Chat Box in your Blogger Blog, you have to log in to your Blogger Blog Account. Now click on Layout from the left side menu. Then click on Add a Gadget. After clicking on Add a Gadget a you will get lots of gadgets. Find out HTML/JavaScript Gadget and click on that. After clicking on pop-up window will open. There you will get two text input boxes. Now paste the codes for the Zopim Live Chat Box into the Content Box and click on the Save Button.

Yeah, you have completed the Set Up of the Instant/Live Chat Box in your Blog. Now you can chat with the visitors of your Blog easily.
Written by +Muhammad Fazlul Hauqe 


Saturday, May 10, 2014

Speed Controlled Marquee for Website Designing


We need to use <marquee> tag to run text and/or images on webpages. We may run them in different ways using different values. To show the news headlines or important messages we may use <marquee> tag. Some examples of Marquee is given below.
Normal Marquee:

www.iDhali.com

It's a simple marquee created using the normal <marquee> tag without any customization. Necessary codes for the above marquee is given below.

<html>

   <head>
     <title>iDhali</title>
   </head>

   <body>
     <marquee> www.iDhali.com  </marquee>
   </body>

</html>


How to test the above marquee?
1. Press Windows Key + R buttons together to open the RUN Command Box. Then type Notepad into the Text Input Box and press the Enter Key or click on the OK button. A new notepad program will open.

2. Now copy and paste the above codes or type them into the Notepad. Click on File from the menu, a drop-down menu will open. Then click on Save As... , a pop-up window will open. Provide a name with .html or .htm extension as click on the Save button.

3. Finally locate the HTML files and double click on that to open. The file will must open with the default browser of your Computer System.

N.B. Remember only the line <marquee> www.iDhali.com </marquee> is enough to create the marquee. But the rest you need to use to form a html file.

Formatted Marquee:
www.iDhali.com

It's a formatted marquee, I have formatted using <font> tag. But rest of the codes are same to the above codes of the normal marquee. However, the codes for the above Marquee is given below...

<html>

   <head>
      <title>iDhali</title>
   </head>

   <body>

      <marquee><font color="3778CD" face="calibrimath" size="14">www.iDhali.com</font></marquee>
   </body>

</html>

Code Description:
All the above codes are to form a webpage. Only the line in italic form is to create the above formatted marquee. To create the marquee I have used the simple <marque> tag, but customized <font> tag to format the text. color="3778CD" is used to define the text color,  face="calibrimath" is used to define a font and size="14" is used to define the font size.

Speed Controlled Marquee:
www.iDhali.com

It's a speed controlled marquee, I have created using the code scrollamount="1". The value may be 1, 2, 3 or anything you like. The code for the above marquee is given below...

<html>

   <head>
      <title>iDhali</title>
   </head>

   <body>
     <marquee scrollamount="1"><font color="3778CD" size="14" face="Verdana">www.iDhali.com</font></marquee>
   </body>

</html>


Thursday, May 1, 2014

Download YouTube Videos Without Any Software


YouTube doesn't allow to download the uploaded videos from their site. That's why we have to download them following some tricks. Using Internet Download Manager (IDM) is one of them. But the trial version of IDM normally works for 30 days on a computer system. And it is not fit always to download high resolution videos.
YouTube Video,Download,downloading youtube video
However, you may now download videos from YouTube without any software. Lets download any video from YouTube in 5-7 formats following the steps given below.

 Step 01  Provide the Link of the YouTube Video
Go to www.keepvid.com to visit KEEPVID Website first. There you have to provide the link of the YouTube Video you want to download. Then click on the DOWNLOAD button as showing in the image below.

 Step 02  Pass the Security Warning
After clicking on the DOWNLOAD button, a security alert box will appear within a few seconds. Then check the box where is written "I accept the risk and want to run this application" as like as the image given below. Then click on the Run button.

 Step 03  Download Video in Your Expected Resolution
After clicking on the Run button you will be able to download your expected YouTube video in many different formats with different resolutions. To download the video in your expected format or resolution you just need to click on the links according to your expectation.


Thus you may now download any YouTube Video in your expected resolution without any software.

Note:  To download YouTube Videos following this tricks, the computer system must have to installed Java. If the system don't have installed Java then download Java from here.
Written by +Muhammad Fazlul Hauqe