In the previous post we have just created a simple unordered list. Now we will customize the list using CSS to make an effective menu. Later we will change it to a Responsive Menu that will response differently depending on different types of display size of the visitors. We will work with the existing codes we used in the previous post. Lets follow the steps given below.
Step 01 Link a CSS Stylesheet with the menu.html File
First of all open a new text file and save it as menu.css (must with .css extension), then open the menu.html file in a text editor and add the new line <link rel="stylesheet" type="text/css" href="menu.css"> before the closing </head> tag.
Step 02 Add an Attribute id for the ul tag
First of all open a new text file and save it as menu.css (must with .css extension), then open the menu.html file in a text editor and add the new line <link rel="stylesheet" type="text/css" href="menu.css"> before the closing </head> tag.
Step 02 Add an Attribute id for the ul tag
Now add an attribute id with the value menu for the <ul> tag. That means the tag <ul> will be changed to <ul id="menu">. We will add this attribute id, so that we can target the unordered list to customize. I have used menu as the value of the attribute id, but you may use anything you like. Now save the html file menu.html finally.
After linking the menu.css style-sheet and adding the attribute id for the <ul> tag, the total codes will look like...
<!DOCTYPE html>
<html>
<head>
<title>Responsive Menu</title>
<link rel="stylesheet" type="text/css" href="menu.css">
</head>
<body>
<ul id="menu">
<li><a href="#">Home</a></li>
<li><a href="#">Tips & Tricks</a></li>
<li><a href="#">Tutorials</a></li>
<li><a href="#">Forum</a></li>
<li><a href="#">About Us</a></li>
<li><a href="#">Contact Us</a></li>
</ul>
</body>
</html>
Step 03 Change the Background Color of the Menu
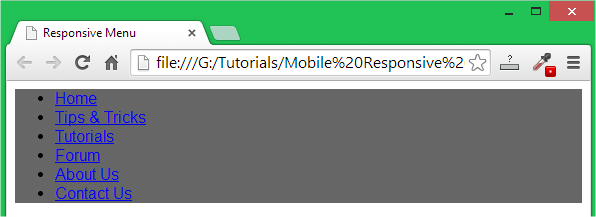
Open menu.css file in a text editor and type the following codes given below. Look I have used #menu to target the ul where we used the value menu for the attribute id. So the background color of the unordered list will be changed for the codes given below.
#menu{
background-color: #666;
}
Save the css file and open the menu.html file in a browser. You will get a background like the image below. That means, we are succeed to target the unordered list set.
Again add some more lines after the above codes to display the list in one line. The codes you need to add is given below...
#menu li{
display: inline-block;
}
After adding the above codes, save the menu.css file and reload the menu.html file. Now the menu will look like the image given below.
Add some more codes given below to get a better look. By the codes given below, actually we will format the anchor text.
#menu li a{
text-decoration: none;
color: #fff;
padding: 5px;
}
After adding the above codes into the menu.css file save that and reload the page menu.html. You will get the following change as shown in the image below.
In the above image, the menu is looking too thin. That's why we will add some more space to make it more thicker by adding some padding.
padding-top: 5px;
padding-bottom: 5px;
We need to add the above two lines after the line display: inline-block;. Now save the CSS file again and reload the menu.html file, you will get the following menu given below.
Finally, all the codes for the menu.css file will be...
#menu{
background-color: #666;
}
#menu li{
display: inline-block;
padding-top: 5px;
padding-bottom: 5px;
}
#menu li a{
text-decoration: none;
color: #fff;
padding: 5px;
}
#Responsive Menu:
1. Responsive Menu 01: Basic Structure of a Website
2. Responsive Menu 03: Make the Menu Responsive adding Some More Codes


No comments:
Post a Comment