Tuesday, December 31, 2013

C Program to Define the Prime Number from the Provided Number

Objectives
-to find out the Prime/Largest Number from the provided number
-to learn the use of else if condition
-to learn to declare float-type variables
-to learn how to input several data from keyboard
-to know how to compare several data after providing by keyboard
-to learn how to show only two digit after the point in a float-type number
When you will run the C Program given below, then the text Enter the First Number: will appear on the screen. That means, you have to input a number from the keyboard. When you will press the Enter Key after providing the first data, again a line Enter the Second Number: will appear. Similarly you will be asked for the 3rd number. Finally, you will get a result like- .... ....  is the Largest Number.

#include<stdio.h>
void main()
{
float n1,n2,n3;
printf("Enter the First Number: ");
scanf("%f",&n1);
printf("Enter the Second Number: ");
scanf("%f",&n2);
printf("Enter the Third Number: ");
scanf("%f",&n3);
if(n1>n2&&n1>n3)
printf("%.2f is the Largest Number",n1);
else if("n2>n1&&n2>n3")
printf("%.2f is the Largest Number",n2);
else
printf("%.2f is the Largest Number",n3);
}
prime number,largest number,c program,if else condition
Description of the above codes
float n1,n2,n3;
The above line is the fourth line of the program.  In this line I have declared three float-type variables n1, n2 and n3. We will keep three numbers into these three variables and later we will compare them with one another to find out the largest one. int & char are two more data type. We may use int for integer type data and char for character type data. Semicolon (;) is must at the end of the line where we will declare variables. The variables will be separated by comma (,).

printf("Enter the First Number: ");
This is the fifth line of the above program. By this line, the program will print the writings Enter the Number: on the screen. You have to provide a number after showing this line. You may print anything you like to show by replacing the line by printf("text you want to show"); The rest of the line is must. The seventh and the ninth line are playing the same role in the program.

scanf("%f",&n1);
This is the sixth line of the program. The program will get the data by this line that we will provide using keyboard. The data will be stored into a variable named n1, we declared at the fourth line. Here, we have  to use %f as we will input float-type data. Similarly we need to use %d for integer type data and %c for character type data. The eighth and the tenth line are same to this sixth line. In eighth line the program will store the another data into the variable n2 and in tenth line the data will be stored into the variable n3. Later we will use this tree data to compare each other.

if(n1>n2&&n1>n3)
The program will perform a logical operation during executing this line. In this line, the program will compare n1 with n2 and n3. If the program found that n1 is greater than the rest two then it will execute the next line printf("%.2f is the Largest Number",n1); In this line I have told the program to show the data we kept into the variable n1. %f is enough to define a float type data during printing on the screen. But I have used %.2f. Because, I want to show two digit after the point. That means the result will be 8.13 or something like this. If we use %.3f, then the result will be 8.132

else if("n2>n1&&n2>n3")
If the first condition become false then the program will execute this line. In this line n2 will be compared with n1 and n3. If n2 is greater than the rest two then the program will execute the fourteenth line printf("%.2f is the Largest Number",n2); and will show the data kept into the variable n2. Otherwise the program will execute the line else and will show the data kept into the variable n3.


Saturday, December 28, 2013

Installing dual operating system on the same hard disk

Sometimes we need to install dual operating system in our computer. For example: you are very familiar with one of the earlier versions of windows operating system but you want to try the new version. In this situation you may install and use the newer release of windows operating system on the same computer alongside the older version.

On the other hand, we may also install and use both of windows and Linux (including Ubuntu, Kubuntu etc.) operating system at a time on the same computer, in the same hard disk drive.

Installing both windows and Linux operating system on the same hard disk drive is not so hard. Even it will work very smoothly and successfully without any disturbance. Let's see how to install dual operating system on the same hard disk.

 Step 01  Select two different drive/partition for two OS
First of all you need to select two different drives (also known as partition) of your hard disk drive. But in some computers there is only one disk drive with a single partition. If you have such a computer then you need to re-partition the hard disk drive.

However, suppose there are three drive/partition in your hard disk and you want to install an earlier version and a newer version of windows operating system. In this case you have to select Local Disk (C:) for the earlier version and the last partition for the newer version of windows operating system.
dual boot,dual operating system,windows & linux os
 Step 02  Install the earlier version in Local Disk (C:)
Simply install the selected earlier version of windows operating system in the first partition/drive known as Local Disk (C:).

N.B. If you want to install a windows operating system and Linux/Ubuntu together, then you have to also install the windows operating system first in the Local Disk (C:) and later the next one in the last partition of the hard disk drive.

 Step 03  Install the newer version of windows OS
After installing the earlier version, now you need to install the newer version of windows OS or any other OS like Linux, Ubuntu, Kubuntu etc. in the last drive/partition of the hard disk. Now restart your computer, you will get an option to select the operating system by which one you want to boot your computer.

Boot your computer with one of the installed operating system and enjoy your dual booting computer. Learn to make a pen drive bootable and install an operating system using it.


Hide Facebook add friend button from your profile [Updated]


Today Facebook is a very common Social Network Site to the Internet Users. There are a lots of Facebook Users who can't think a single moment without Facebook. They stay Signed-in all day long to communicate with others.

The Facebook Users like to update their status, photos and videos to share with their friends. Most of the Facebook Users keep them busy in chatting. Though there are a lots of features in Facebook but sometimes we have to face some problems for others.

You all know that there is a +1 Add Friend button in every Facebook User's profile so that other can send friend requests by clicking on this +1 Add Friend button. Generally anyone can send you friend request for this +1 Add Friend button. Because, this button is available for all others. But you can hide the Facebook Add Friend Button from your profile.


If you change the settings to hide your Facebook Profile's +1 Add Friend Button then the strangers won't be able to send you friend requests anymore. But your friend's friends that means mutual friends will found the +1 Add Friend button and will be able to send you Friend Requests. So do you want to hide the Facebook Add Friend Button from your profile? Then follow the steps given bellow to hide the "+1 Add Friend" button from your Facebook Profile.


Watch the video to know how to hide a Facebook Add Friend Button practically.


 Step 01  Log in and Click on Privacy Settings
At first you need to Sign in to your Facebook Account. Now click on the Down Arrow Key Sign located on the uppermost right corner of the Facebook Home Page. After clicking on the Down Arrow Key Sign a drop down menu will open. Now click on "Settings" from the drop down menu.


 Step 02  Click on Privacy from the Left Side Menu
Now click on Privacy from the left side menu.


 Step 03  Click on Edit of Who can contact me? Section
Now go to the section Who can contact me? and click on Edit of Who can send you friend requests? settings.


 Step 04  Open the Drop-down Menu
After clicking on Edit, you will get a option like the image given below. Now click on the down arrow key sign.

 Step 05  Select Friends of Friends instead of Everyone
Now click on Friends of Friends from the drop-down menu. There is selected Everyone by default. That means anybody can send you friend request.


 Steps 06  Save the Settings and Check Your Profile
Now click on Close to complete the settings. You may check it if you have another Facebook Account.


Remember, You have no right to hide your Facebook Add Friend Button for all. You can only hide the button only from the strangers. But your friends of friends (Mutual Friends) will be able to send you friend requests if they want.


Advertisement

Wednesday, December 25, 2013

Adding neon light animated text to a blogger blog/website

In this post you will learn to create an animated message using JavaScript. The effect I have created in this message is also known as neon light text effect.

By adding this animated neon light text you may greet the visitors of your website or you may draw the attention on any notice and/or important message.

All the codes you need is given below, I haven't used any hosted .js file. So feel free to add this text effect in your blog/website. You just need some simple customization to add your expected text.

But it's also possible if you want to customize the speed, color etc. Just follow the steps given below to create your own neon light text and to add them in your blog or website.

First of all we will create a webpage to test the neon light text effect. Later we will add the necessary JavaScript codes to our blogger blog or website.

 Step 01  Open the notepad text editor
First of all open the notepad text editor. To open notepad press the Windows Key+R together, the run command box will open. Now type notepad into the command box and press the Enter Key, a new notepad document will open.

 Step 02  Add all the codes given below to the notepad document
Now copy all the codes given below and paste them to the notepad document. Then save the document as JavaScript.html. Press Ctrl+S to open the Save As window. To save the notepad document as an HTML file type the file name with .html or .htm extension and finally click on the Save button.

<!DOCTYPE html>
<html>
    <head>
        <title>iDhali</title>
        <meta charset="UTF-8">
        <meta name="viewport" content="width=device-width, initial-scale=1.0">
    </head>
    <body>
        <div style="text-align: center;">
            <h1>
                <script type="text/javascript">
                    var message = "Welcome Message";
                    var neonbasecolor = "gray";
                    var neontextcolor = "#2CA0EA";
                    //Lighter var flashspeed=100
                    var neontextcolor2 = "#5AB9F5"; 
                    //number of letters flashing in neontextcolor
                    var flashingletters = 3;
                    //number of letters flashing in neontextcolor2 (0 to disable)
                    var flashingletters2 = 1;
                    //the pause between flash-cycles in milliseconds
                    var flashpause = 0;
                    //speed of flashing in milliseconds
                    var flashspeed = 100; 
                    var n = 0;
                    if (document.all || document.getElementById) {
                        document.write('<font color="' + neonbasecolor + '">');
                        for (m = 0; m < message.length; m++)
                            document.write('<span id="neonlight' + m + '">' + message.charAt(m) + '</span>');
                        document.write('</font>');
                    }
                    else
                        document.write(message);
                    function crossref(number) {
                        var crossobj = document.all ? eval("document.all.neonlight" + number) :
                                document.getElementById("neonlight" + number);
                        return crossobj;
                    }
                    function neon() {
                        if (n === 0) { //Change all letters to base color
                            for (m = 0; m < message.length; m++)
                                crossref(m).style.color = neonbasecolor;
                        } //cycle through and change individual letters to neon color
                        crossref(n).style.color = neontextcolor;
                        if (n > flashingletters - 1)
                            crossref(n - flashingletters).style.color = neontextcolor2;
                        if (n > (flashingletters + flashingletters2) - 1)
                            crossref(n - flashingletters - flashingletters2).style.color = neonbasecolor;
                        if (n < message.length - 1)
                            n++;
                        else {
                            n = 0;
                            clearInterval(flashing);
                            setTimeout("beginneon()", flashpause);
                            return;
                        }
                    }
                    function beginneon() {
                        if (document.all || document.getElementById)
                            flashing = setInterval("neon()", flashspeed);
                    }
                    beginneon();
                </script>
            </h1>
        </div>
    </body>
</html>

 Step 03  Test the newly created HTML file
Locate the newly created JavaScript.html file and open it in Google Chrome/Mozilla Firefox or any other internet browser. You will get the animated neon light text.

Adding neon light animated text


Step 01: Log in to your blogger account, then click on Layout. Now click on Add a Gadget, a pop up window will open. From the window find out HTML/JavaScript gadget and click on that to add, another pop-up window will open.

Step 02: Now copy the JavaScript codes given inside <body> and </body>. Then paste the codes into the content box of the opened pop up window and click on the Save button.

Step 03: Finally place the newly added gadget where you want to show it and click on the button Save Arrangement. Click on View Blog to check the message if it is working or not.

N.B. Paste the codes inside a div where you want to show neon light animated text in your HTML and/or PHP website.


Monday, December 23, 2013

Banner Image/Logo for Dynamic View Blogger Template


 Step 01  Log in to Your Blogger Account
As you have to play admin role in your blog, so you have to log in to your blogger account first. Noow select the blog you want to add banner if you have several blogs. Now click on Template from the left side menu. Again click on the button named Customize and wait a while to reload.


 Step 02  Add an Background Image
You are now Blogger Template Designer page. Click on Background from the menu, then click on the down arrow key sign as shown in the image below.


 Step 03  Add the Image from Your Computer
There are lots of images by default for background. But you have to use your own logo or banner image you want to show. But remember the image should not be more than 65 pixel in height. However now click on the writings Upload Image as shown in the image below.


 Step 04  Add an Image of 65 pixel height
Now click on the button Choose File. Then select the image you want to add. After selecting the image, you have to click on the Done button.


 Step 05  Customize the Alignment and Tile
Now you have to customize the Banner Image/Logo. Problem you may face if you don't customize...
  1. The Blog Title may be over the Banner Image/Logo.
  2. The image may be tiled.
That's why you need to customize. First of all click on the down arrow sign as shown below and select the following alignment already selected in the image. Similarly select Don't tile.


 Step 06  Customize the Blog Title and Description
Now click on Advanced>Blog Title and then select Transparent instead of a color. Do the same for the Blog Description.


Sunday, December 22, 2013

How to Add Digg Button to a Blogger Blog or Website


Digg Button is also helpful as like as other share buttons. You should let the visitors to share your posts to the Digg Community. That's why digg button is needed in your webpage.
 Step 01  Log in to your blogger account
Log-in to your blogger account first following the link www.blogger.com Now click on Template from the left side menu. Then click on Edit HTML as shown in the image given below.

 Step 02  Find out </head> or </body>
After clicking on Edit HTML, the HTML Editor will open. Now click anywhere of the codes and press Ctrl+F to enable search option. Type </head> or </body> into the find box and press the Enter Key to find out it.
 Step 03  Paste the codes before </head> or </body> Now paste the following codes given below before </head> or </body>.
<script type="text/javascript">
(function() {
var s = document.createElement('SCRIPT'), s1 = document.getElementsByTagName('SCRIPT')[0];
s.type = 'text/javascript';
s.async = true;
s.src = 'http://widgets.digg.com/buttons.js';
s1.parentNode.insertBefore(s, s1);
})();
</script>

 Step 04  Paste the following codes after <data:post.body/>
Again type <data:post.body/> into the search box and find out it. Then paste the following codes given below after <data:post.body/> tag.
<b:if cond='data:blog.pageType == "item"'>
<a class="DiggThisButton [Button Name]"></a>
</b:if>

 Step 05  Now select your button type
Now you have to replace [Button Name] with your preferred button name. There are three most common popular Digg Buttons. You have to select one from these three. The name of the buttons are given below. Button 01: DiggWide
Button 02: DiggMedium
Button 03: DiggCompact


Saturday, December 21, 2013

Recover or Retrieve Deleted Files by System Mechanic Software


Do you know that, you may now recover the deleted files and folders easily! Even if you've you deleted your data from the Recycle Bin. We'll use a software named System Mechanic Pro to recover the deleted files ad folders. The easy 5 steps to recover or retrieve the data from a Computer System is given below. At first you need to download the software from here. Now install System Mechanic Software step by step. Read this article to know how to install this software.
 Step 01  Run System Mechanic Pro Software
Double click on the Search and Recover icon from your desktop or found it into the Start Menu. After clicking on it, you will get a window called IOLO SEARCH AND RECOVER. Now click on File Rescue Wizard from the window.
Recover DataRecover Data
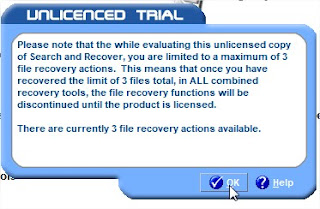
But you may get an Error Message if you are a user of Windows 7 or Windows 8. The Error Message is given below. You have to click on OK button if you found this message.
Recover Data
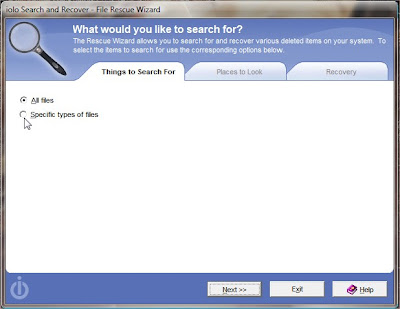
 Step 02  Select the Radio Button All Files
At last a new window will open like the image below. Now select the radio button All files and click on Next>> button. You may also select the second radio button Specific types of files to choose the specific types of files.
Recover Data
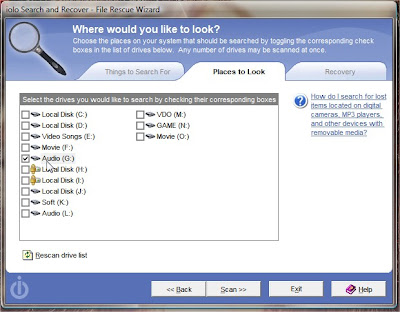
 Step 03  Select the Drive where the Data was Stored
A new window will open like the image given below. Now select a drive or more where the data was stored. After selecting the drives, you have to click on the Scan button. It will take a few minutes to scan the Deleted Data.
Recover Data
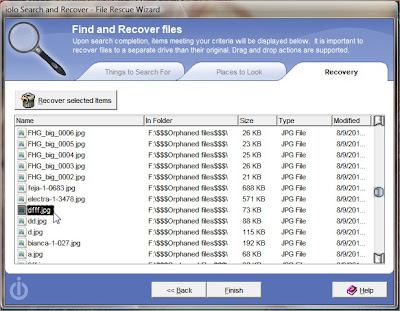
 Step 04  Select Data and Click on Recover Selected Items
After searching, a list of all deleted data will be available like the image below. Now select one or more from the list and click on the button Recover selected items.
Recover Data
 Step 05  Select a Drive Where You Want to Save the Recovered Data
Now another window will open where you need to select a drive or folder to save the recovered data. After selecting the drive, you need to click on OK. Then press Finish and then close the window. Now check the drive you were selected to get the deleted file.
Recover Data


How to Add Mouse Follow Clock to Your Website


We all like to do something different from others. We like to show our creativity in every spear of our life. Website Designing is such a field where we can show our creativity properly. The fuel of success in Website Designing is Creativity. So we must learn something special to do, so that you can be exceptional from others. You may know that there are CSS, JavaScript etc. Web Programming Languages to make the Website stylish and more effective. You may add thousands of amazing styles, effects, widgets by these Web Programming Languages. However now I will discuss here about Mouse Follow Clock. Mouse Follow Clock is a Analog Clock what is effective in webpage. This Mouse Follow Analog Clock is formed with some dots, numbers and alphabets (Characters). The clock will run after the mouse arrow. But when the mouse arrow will stop somewhere then the Analog Clock will be formed again in a short time and will start in a very few moment. You may see the example from here. Here you will get a .html file. The file is only 2.55 KB in size. Just download this and see the example.
Hope you are surprised to see the Mouse Follow Clock and thinking to add this to your own website. So follow the steps given below to add this amazing Mouse Follow Analog Clock.


 Step 01  Get the Codes Given Below in the Box
I think you are already experienced in Website Designing. But I know there are some guys also who may be new in this sector. So I am writing detail about adding Mouse Follow Clock. So first of all copy the following codes given below in the box.


<html>
<head>
<body>
www.iDhali.com
</body>
</head>
</html>

The above codes are to make a very simple website. You may just copy the above codes and then paste them in a Notepad Document. After pasting those codes on a Notepad then go to File Menu and click on Save As... to save the document as MouseFollowClock.html. After saving the Document as MouseFollowClock.html then open the .html file again with a Browser Software. After opening the .html file you will get www.iDhali.com text on the webpage but not any clock yet! :)

 Step 02  Paste the Codes Given Below between <head> and </head> Tags
Now copy the following codes given bellow in the box and post them just between <HEAD> and </HEAD> tags. That means you may paste these codes just after Opening <HEAD> tag or Just before Closing </HEAD> tag.

<style type="text/css">
<!--
/*Do not Alter these. Set for alignment*/
.css1{
position:absolute;top:0px;left:0px;
width:16px;height:16px;
font-family:Arial,sans-serif;
font-size:16px;
text-align:center;
font-weight:bold;
}
.css2{
position:absolute;top:0px;left:0px;
width:10px;height:10px;
font-family:Arial,sans-serif;
font-size:10px;
text-align:center;
}
//-->
</style>

 Step 03  Provide the Codes Given Below Before </body> or </html> Tag
Again copy the Codes from the following box given bellow and paste them before the Closing Tags </BODY> or </HTML>.

<script language="JavaScript">
<!-- http://www.fairytips.blogspot.com -->
<!-- Mouse Follow Clock 
//Hide from older browsers 
if (document.getElementById&&!document.layers){
// *** Clock colours
dCol='#000000';   //date colour.
fCol='#091ABB';   //face colour.
sCol='#BF0C2E';   //seconds colour.
mCol='#000000';   //minutes colour.
hCol='#000000';   //hours colour.
// *** Controls
del=0.6;  //Follow mouse speed.
ref=40;   //Run speed (timeout).
//  Alter nothing below!  Alignments will be lost!
var ieType=(typeof window.innerWidth != 'number');
var docComp=(document.compatMode);
var docMod=(docComp && docComp.indexOf("CSS") != -1);
var ieRef=(ieType && docMod)
?document.documentElement:document.body;
theDays=new Array("SUNDAY","MONDAY","TUESDAY","WEDNESDAY", "THURSDAY","FRIDAY","SATURDAY");
theMonths=new Array("JANUARY","FEBRUARY","MARCH","APRIL","MAY","JUNE","JULY","AUGUST", "SEPTEMBER","OCTOBER","NOVEMBER","DECEMBER");
date=new Date();
day=date.getDate();
year=date.getYear();
if (year < 2000) year=year+1900; 
tmpdate=" "+theDays[date.getDay()]+" "+day+" "+theMonths[date.getMonth()]+" "+year;
D=tmpdate.split("");
N='3 4 5 6 7 8 9 10 11 12 1 2';
N=N.split(" ");
F=N.length;
H='...';
H=H.split("");
M='....';
M=M.split("");
S='.....';
S=S.split("");
siz=40;
eqf=360/F;
eqd=360/D.length;
han=siz/5.5;
ofy=-7;
ofx=-3;
ofst=70;
tmr=null;
vis=true;
mouseY=0;
mouseX=0;
dy=new Array();
dx=new Array();
zy=new Array();
zx=new Array();
tmps=new Array();
tmpm=new Array(); 
tmph=new Array();
tmpf=new Array(); 
tmpd=new Array();
var sum=parseInt(D.length+F+H.length+M.length+S.length)+1;
for (i=0; i < sum; i++){
dy[i]=0;
dx[i]=0;
zy[i]=0;
zx[i]=0;}
algn=new Array();
for (i=0; i < D.length; i++){
algn[i]=(parseInt(D[i]) || D[i]==0)?10:9;
document.write('<div id="_date'+i+'" class="css2" style="font-size:'+algn[i]+'px;color:'+dCol+'">'+D[i]+'<\/div>');
tmpd[i]=document.getElementById("_date"+i).style;}
for (i=0; i < F; i++){
document.write('<div id="_face'+i+'" class="css2" style="color:'+fCol+'">'+N[i]+'<\/div>');
tmpf[i]=document.getElementById("_face"+i).style; }
for (i=0; i < H.length; i++){
document.write('<div id="_hours'+i+'" class="css1" style="color:'+hCol+'">'+H[i]+'<\/div>');
tmph[i]=document.getElementById("_hours"+i).style;}
for (i=0; i < M.length; i++){
document.write('<div id="_minutes'+i+'" class="css1" style="color:'+mCol+'">'+M[i]+'<\/div>');
tmpm[i]=document.getElementById("_minutes"+i).style; }
for (i=0; i < S.length; i++){
document.write('<div id="_seconds'+i+'" class="css1" style="color:'+sCol+'">'+S[i]+'<\/div>');
tmps[i]=document.getElementById("_seconds"+i).style; }
function onoff(){
if (vis){ 
 vis=false;
 document.getElementById("control").value="Clock On"; }
else{ 
 vis=true;
 document.getElementById("control").value="Clock Off";
 Delay();}
kill();}
function kill(){
if (vis) 
 document.onmousemove=mouse;
else 
 document.onmousemove=null;
function mouse(e){
var msy = (!ieType)?window.pageYOffset:0;
if (!e) e = window.event;    
 if (typeof e.pageY == 'number'){
  mouseY = e.pageY + ofst - msy;
  mouseX = e.pageX + ofst;}
 else{
  mouseY = e.clientY + ofst - msy;
  mouseX = e.clientX + ofst;}
if (!vis) kill();}
document.onmousemove=mouse;
function winDims(){
winH=(ieType)?ieRef.clientHeight:window.innerHeight; 
winW=(ieType)?ieRef.clientWidth:window.innerWidth;}
winDims();
window.onresize=new Function("winDims()");
function ClockAndAssign(){
time = new Date();
secs = time.getSeconds();
sec = Math.PI * (secs-15) / 30;
mins = time.getMinutes();
min = Math.PI * (mins-15) / 30;
hrs = time.getHours();
hr = Math.PI * (hrs-3) / 6 + Math.PI * parseInt(time.getMinutes()) / 360;
for (i=0; i < S.length; i++){
 tmps[i].top=dy[D.length+F+H.length+M.length+i]+ofy+(i*han)*Math.sin(sec)+scrollY+"px";
 tmps[i].left=dx[D.length+F+H.length+M.length+i]+ofx+(i*han)*Math.cos(sec)+"px";}
for (i=0; i < M.length; i++){
 tmpm[i].top=dy[D.length+F+H.length+i]+ofy+(i*han)*Math.sin(min)+scrollY+"px";
 tmpm[i].left=dx[D.length+F+H.length+i]+ofx+(i*han)*Math.cos(min)+"px";}
for (i=0; i < H.length; i++){
 tmph[i].top=dy[D.length+F+i]+ofy+(i*han)*Math.sin(hr)+scrollY+"px";
 tmph[i].left=dx[D.length+F+i]+ofx+(i*han)*Math.cos(hr)+"px";}
for (i=0; i < F; i++){
 tmpf[i].top=dy[D.length+i]+siz*Math.sin(i*eqf*Math.PI/180)+scrollY+"px";
 tmpf[i].left=dx[D.length+i]+siz*Math.cos(i*eqf*Math.PI/180)+"px";}
for (i=0; i < D.length; i++){
 tmpd[i].top=dy[i]+siz*1.5*Math.sin(-sec+i*eqd*Math.PI/180)+scrollY+"px";
 tmpd[i].left=dx[i]+siz*1.5*Math.cos(-sec+i*eqd*Math.PI/180)+"px";}
if (!vis)clearTimeout(tmr);}
buffW=(ieType)?80:90;
function Delay(){
scrollY=(ieType)?ieRef.scrollTop:window.pageYOffset;
if (!vis){
 dy[0]=-100;
 dx[0]=-100;}
else{
 zy[0]=Math.round(dy[0]+=((mouseY)-dy[0])*del);
 zx[0]=Math.round(dx[0]+=((mouseX)-dx[0])*del);}
for (i=1; i < sum; i++){
 if (!vis){
  dy[i]=-100;
  dx[i]=-100;}
 else{
  zy[i]=Math.round(dy[i]+=(zy[i-1]-dy[i])*del);
  zx[i]=Math.round(dx[i]+=(zx[i-1]-dx[i])*del);}
if (dy[i-1] >= winH-80) dy[i-1]=winH-80;
if (dx[i-1] >= winW-buffW) dx[i-1]=winW-buffW;}
tmr=setTimeout('Delay()',ref);
ClockAndAssign();}
window.onload=Delay;}
//-->
</script>

 Step 04  Lets See the Total Code You will Get
So the total Codes will look like this... You may just copy the following codes all at a time in a Notepad Document and then save that Notepad Document as a .html file to get the Mouse Follow Analog Clock.

<html>
<head>

<style type="text/css">
<!--
/*Do not Alter these. Set for alignment*/
.css1{
position:absolute;top:0px;left:0px;
width:16px;height:16px;
font-family:Arial,sans-serif;
font-size:16px;
text-align:center;
font-weight:bold;
}
.css2{
position:absolute;top:0px;left:0px;
width:10px;height:10px;
font-family:Arial,sans-serif;
font-size:10px;
text-align:center;
}
//-->
</style>
<body>
www.iDhali.com
</body>
</head>
<script language="JavaScript">
<!-- http://www.iDhali.com -->
<!-- Mouse Follow Clock
//Hide from older browsers 
if (document.getElementById&&!document.layers){
// *** Clock colours
dCol='#000000';   //date colour.
fCol='#091ABB';   //face colour.
sCol='#BF0C2E';   //seconds colour.
mCol='#000000';   //minutes colour.
hCol='#000000';   //hours colour.
// *** Controls
del=0.6;  //Follow mouse speed.
ref=40;   //Run speed (timeout).
//  Alter nothing below!  Alignments will be lost!
var ieType=(typeof window.innerWidth != 'number');
var docComp=(document.compatMode);
var docMod=(docComp && docComp.indexOf("CSS") != -1);
var ieRef=(ieType && docMod)
?document.documentElement:document.body;
theDays=new Array("SUNDAY","MONDAY","TUESDAY","WEDNESDAY", "THURSDAY","FRIDAY","SATURDAY");
theMonths=new Array("JANUARY","FEBRUARY","MARCH","APRIL","MAY","JUNE","JULY","AUGUST", "SEPTEMBER","OCTOBER","NOVEMBER","DECEMBER");
date=new Date();
day=date.getDate();
year=date.getYear();
if (year < 2000) year=year+1900; 
tmpdate=" "+theDays[date.getDay()]+" "+day+" "+theMonths[date.getMonth()]+" "+year;
D=tmpdate.split("");
N='3 4 5 6 7 8 9 10 11 12 1 2';
N=N.split(" ");
F=N.length;
H='...';
H=H.split("");
M='....';
M=M.split("");
S='.....';
S=S.split("");
siz=40;
eqf=360/F;
eqd=360/D.length;
han=siz/5.5;
ofy=-7;
ofx=-3;
ofst=70;
tmr=null;
vis=true;
mouseY=0;
mouseX=0;
dy=new Array();
dx=new Array();
zy=new Array();
zx=new Array();
tmps=new Array();
tmpm=new Array(); 
tmph=new Array();
tmpf=new Array(); 
tmpd=new Array();
var sum=parseInt(D.length+F+H.length+M.length+S.length)+1;
for (i=0; i < sum; i++){
dy[i]=0;
dx[i]=0;
zy[i]=0;
zx[i]=0;}
algn=new Array();
for (i=0; i < D.length; i++){
algn[i]=(parseInt(D[i]) || D[i]==0)?10:9;
document.write('<div id="_date'+i+'" class="css2" style="font-size:'+algn[i]+'px;color:'+dCol+'">'+D[i]+'<\/div>');
tmpd[i]=document.getElementById("_date"+i).style;}
for (i=0; i < F; i++){
document.write('<div id="_face'+i+'" class="css2" style="color:'+fCol+'">'+N[i]+'<\/div>');
tmpf[i]=document.getElementById("_face"+i).style; }
for (i=0; i < H.length; i++){
document.write('<div id="_hours'+i+'" class="css1" style="color:'+hCol+'">'+H[i]+'<\/div>');
tmph[i]=document.getElementById("_hours"+i).style;}
for (i=0; i < M.length; i++){
document.write('<div id="_minutes'+i+'" class="css1" style="color:'+mCol+'">'+M[i]+'<\/div>');
tmpm[i]=document.getElementById("_minutes"+i).style; }
for (i=0; i < S.length; i++){
document.write('<div id="_seconds'+i+'" class="css1" style="color:'+sCol+'">'+S[i]+'<\/div>');
tmps[i]=document.getElementById("_seconds"+i).style; }
function onoff(){
if (vis){ 
 vis=false;
 document.getElementById("control").value="Clock On"; }
else{ 
 vis=true;
 document.getElementById("control").value="Clock Off";
 Delay();}
kill();}
function kill(){
if (vis) 
 document.onmousemove=mouse;
else 
 document.onmousemove=null;
function mouse(e){
var msy = (!ieType)?window.pageYOffset:0;
if (!e) e = window.event;    
 if (typeof e.pageY == 'number'){
  mouseY = e.pageY + ofst - msy;
  mouseX = e.pageX + ofst;}
 else{
  mouseY = e.clientY + ofst - msy;
  mouseX = e.clientX + ofst;}
if (!vis) kill();}
document.onmousemove=mouse;
function winDims(){
winH=(ieType)?ieRef.clientHeight:window.innerHeight; 
winW=(ieType)?ieRef.clientWidth:window.innerWidth;}
winDims();
window.onresize=new Function("winDims()");
function ClockAndAssign(){
time = new Date();
secs = time.getSeconds();
sec = Math.PI * (secs-15) / 30;
mins = time.getMinutes();
min = Math.PI * (mins-15) / 30;
hrs = time.getHours();
hr = Math.PI * (hrs-3) / 6 + Math.PI * parseInt(time.getMinutes()) / 360;
for (i=0; i < S.length; i++){
 tmps[i].top=dy[D.length+F+H.length+M.length+i]+ofy+(i*han)*Math.sin(sec)+scrollY+"px";
 tmps[i].left=dx[D.length+F+H.length+M.length+i]+ofx+(i*han)*Math.cos(sec)+"px";}
for (i=0; i < M.length; i++){
 tmpm[i].top=dy[D.length+F+H.length+i]+ofy+(i*han)*Math.sin(min)+scrollY+"px";
 tmpm[i].left=dx[D.length+F+H.length+i]+ofx+(i*han)*Math.cos(min)+"px";}
for (i=0; i < H.length; i++){
 tmph[i].top=dy[D.length+F+i]+ofy+(i*han)*Math.sin(hr)+scrollY+"px";
 tmph[i].left=dx[D.length+F+i]+ofx+(i*han)*Math.cos(hr)+"px";}
for (i=0; i < F; i++){
 tmpf[i].top=dy[D.length+i]+siz*Math.sin(i*eqf*Math.PI/180)+scrollY+"px";
 tmpf[i].left=dx[D.length+i]+siz*Math.cos(i*eqf*Math.PI/180)+"px";}
for (i=0; i < D.length; i++){
 tmpd[i].top=dy[i]+siz*1.5*Math.sin(-sec+i*eqd*Math.PI/180)+scrollY+"px";
 tmpd[i].left=dx[i]+siz*1.5*Math.cos(-sec+i*eqd*Math.PI/180)+"px";}
if (!vis)clearTimeout(tmr);}
buffW=(ieType)?80:90;
function Delay(){
scrollY=(ieType)?ieRef.scrollTop:window.pageYOffset;
if (!vis){
 dy[0]=-100;
 dx[0]=-100;}
else{
 zy[0]=Math.round(dy[0]+=((mouseY)-dy[0])*del);
 zx[0]=Math.round(dx[0]+=((mouseX)-dx[0])*del);}
for (i=1; i < sum; i++){
 if (!vis){
  dy[i]=-100;
  dx[i]=-100;}
 else{
  zy[i]=Math.round(dy[i]+=(zy[i-1]-dy[i])*del);
  zx[i]=Math.round(dx[i]+=(zx[i-1]-dx[i])*del);}
if (dy[i-1] >= winH-80) dy[i-1]=winH-80;
if (dx[i-1] >= winW-buffW) dx[i-1]=winW-buffW;}
tmr=setTimeout('Delay()',ref);
ClockAndAssign();}
window.onload=Delay;}
//-->
</script>
</html>

 Step 05  Change the Color of the Mouse Follow Clock
Not only copying and pasting, you may change some codes also. Look at the above box given in the Step 04 and find out the GREEN COLORED TEXT. Look those GREEN COLORED TEXT are some Color Codes. So you may change the Color of the clock by changing the Color Codes. There is written at the right side of every color codes that which code is for which part of the Mouse Follow Clock.